

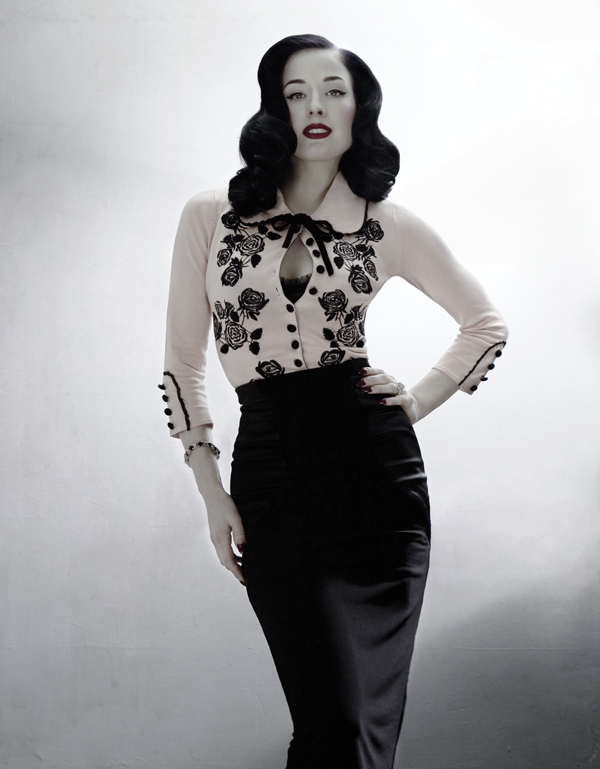
The collaboration between Wheels & Dollbaby and Dita Von Teese has to be the most beautiful piece to grace the category of knitwear of all time. Featuring a peter pan collar, embroided flowers, velvet buttons, pretty pleated contrast satin ribbon trim and a sexy yet classy keyhole, it is beauty unto itself. Which makes it kind of a shame that at £120 it is well out of the budget of your average girl looking to buy a cardigan. I’ve coveted the original blush and black colourway for a long time, and have a lipstick red look-alike blouse that I ordered off eBay forever ago and have since grown to feel dissatisfied with not merely because the craftsmanship is so shoddy that I lose a button everytime I leave the house but also because I’ve grown to feel very uncomfortable with just how blatant a rip-off the design is of the original. But I still can’t afford to justify spending £120 on one cardigan. That’s crazy money for a sweater. It would pain me to figure out how many hours I’d have to work to spend it on that alone.
And yet.
And yet I lust, Dita. I lust.
It’s just so pretty.
And then it came to me. I can’t afford the real thing. But I’m getting pretty handy at creating handmade pieces inspired by luxury goods I can’t afford. Why don’t I just customise a plain cardigan as a low-budget ode to that which I cannot have? With a £10 cream cardi, I did just that.
The first thing I needed was a plain cream cardigan. This in itself was a surprisingly difficult task, because I wanted cream: not white, not beige, not stone grey, not oatmeal, but cream. I was also searching for one with a peter pan collar but it soon became apparent that was a near impossibility of an ask, unless I wanted to use a cardigan of astoundingly thick knit or with bedazzlements and embellishments already afixed, which kind of stepped on the point of my project. So, I had to settle for it being a round neck if not Peter Pan collar, because at least that would create a similar look. It probably didn’t help I was launching my cardigan search in the heat of mid-summer, but how else is a girl to be prepared for the first chill of fall? In the end I settled on a £10 cream cardigan from New Look, the same basic cardigan they stock in several different colours both pastel and bright.
Cardigan acquired, it was time to decide what to do about the flower pattern. It was very obvious I was not going to be embroidering this cardigan myself. I am not a skilled lady. If I had sewing skills thus the like I would be whipping myself up dresses and skirts and adorable capelets on the daily. I decided black lace appliques would do the trick, and off to eBay I scurried–in a purely figurative sense, because the reality, of course, is that I was sitting on my sofa in pyjamas trawling the app on my phone. But work with me here. Picture scurrying. Picture it adorably done, not like a rat or other rodents. Maybe scurrying was a bad word choice there. My bad on that. Too late to fix it now: if I’m so lazy I’m eBaying on my sofa because I can’t be bothered to check for stock at my local craft store then I damn well am too lazy to backspace. Just pretend I’m charming and everything is fine. It’s okay. We can recover from this together.
Okay, back on track, eBay! There’s a lot of choices for this on eBay, but my main concern was finding appliques big enough. I ordered a few different kinds I liked the look of which then failed in-person for practical application because of that classic online buying concern of Well 11cm Seemed Like A Really Big Size When I Pictured It In My Head But In Reality It Turns Out It Needed To Be More Like 25cm Wow I Am Really Bad With Measurements Who Knew. In the end I purchased a set of 5 black flower appliques for £3.95, which gave me plenty of flowers to work with. I was going to cut each applique in half to create single flower and leaf appliques to arrange around the cardigan as I liked, but in the end I decided I liked them well enough in their double strips.
I also needed buttons to replace the plain cream plastic buttons already on the cardigan. I took a trip to C&H Fabrics, where I picked out three packed of 4 buttons of identical size. Originally I planned to go the satin button route, but I liked these ridged black plastic buttons too, decided they would look just as good from the typical scrutiny distance of a person admiring one’s clothes, and were cheaper, so, you know, I tightassed it.
Finally I pinched a black satin pre-made bow from my hair accessories stock bin, and got out my pins, measuring tape, needle and thread. Off came the buttons and on went the black replacements. I laid the cardigan flat on my sofa while I placed the appliques in different patterns and arrangements in order to determine the look I liked best, then pinned it loosely in place with safety pins. Trying the cardigan on in front of the mirror I could gauge whether I’d arranged my flowers in the most flattering positions, and moved the appliques up and down where necessary for the perfect placement until I was satisfied.
With the cardigan off and in my lap I pinned the flowers more securely into place with more safety pins so that every edge of the flower would be held securely as I worked. Then, even as a novice sewer who technically knows how to do nothing but a very sloppy back stitch, I stitched all the flowers into place by looping the thread round the edging of the entire applique onto the cardigan until the whole thing was sewn into place, and then used the same looping tack to fix the flowers even more securely in a few places on the inside of the applique. I repeated this with the bottom applique, then I laid the cardigan flat and got out my measuring tape to ensure I had the placement of appliques on the second side of the cardigan identically mirrored so that I didn’t accidentally end up with one flower veering off an excited extra inch towards my crotch or placed skewiff on my boob so as to give me a lop-sided breasticles look. Placement corrected, safety pins holding flowers securely in place, on I sewed.
On the original Dita cardigan there’s that lovely detail on the 3/4 sleeve with 3 buttons edged by black trim. I debated the black trim but decided not to stretch my sub-par sewing skills too far by testing them with the task of sewing trim on straight and in the same place on two different sleeves. Instead I added just 3 buttons to each sleeve.
Finally I pinned the bow into place above my top button. I sewed it to the cardigan on the right side, careful only to sew through the back of the bow so that no stitching was visible through the front of the bow, then used a popper to secure the left side of the bow to the cardigan on the left. (As my costume-design student sister repeatedly told me: Remember, the man always goes on top! Filthy costume students. I.e. in a popper set one half of the popper is flat with a protruding, uh, popper, and that is the half that is always sewn onto the item of clothing that will be on top, the item that will be pushed onto the half of the popper that is fixed to the body of your clothing, like your coat, cardigan, etc. The female half of the popper seems to have a ‘sticky outty bit’ too but only when it’s upside down. The female half of the popper has more curved edges and is the half that will accommodate the second popper slotting into it. That popper half is the piece that needs to be sewn onto the cardigan itself rather than the bow. I know, it’s all very graphic for such a classy cardigan. Don’t blame me. I am the scandalised messenger.)
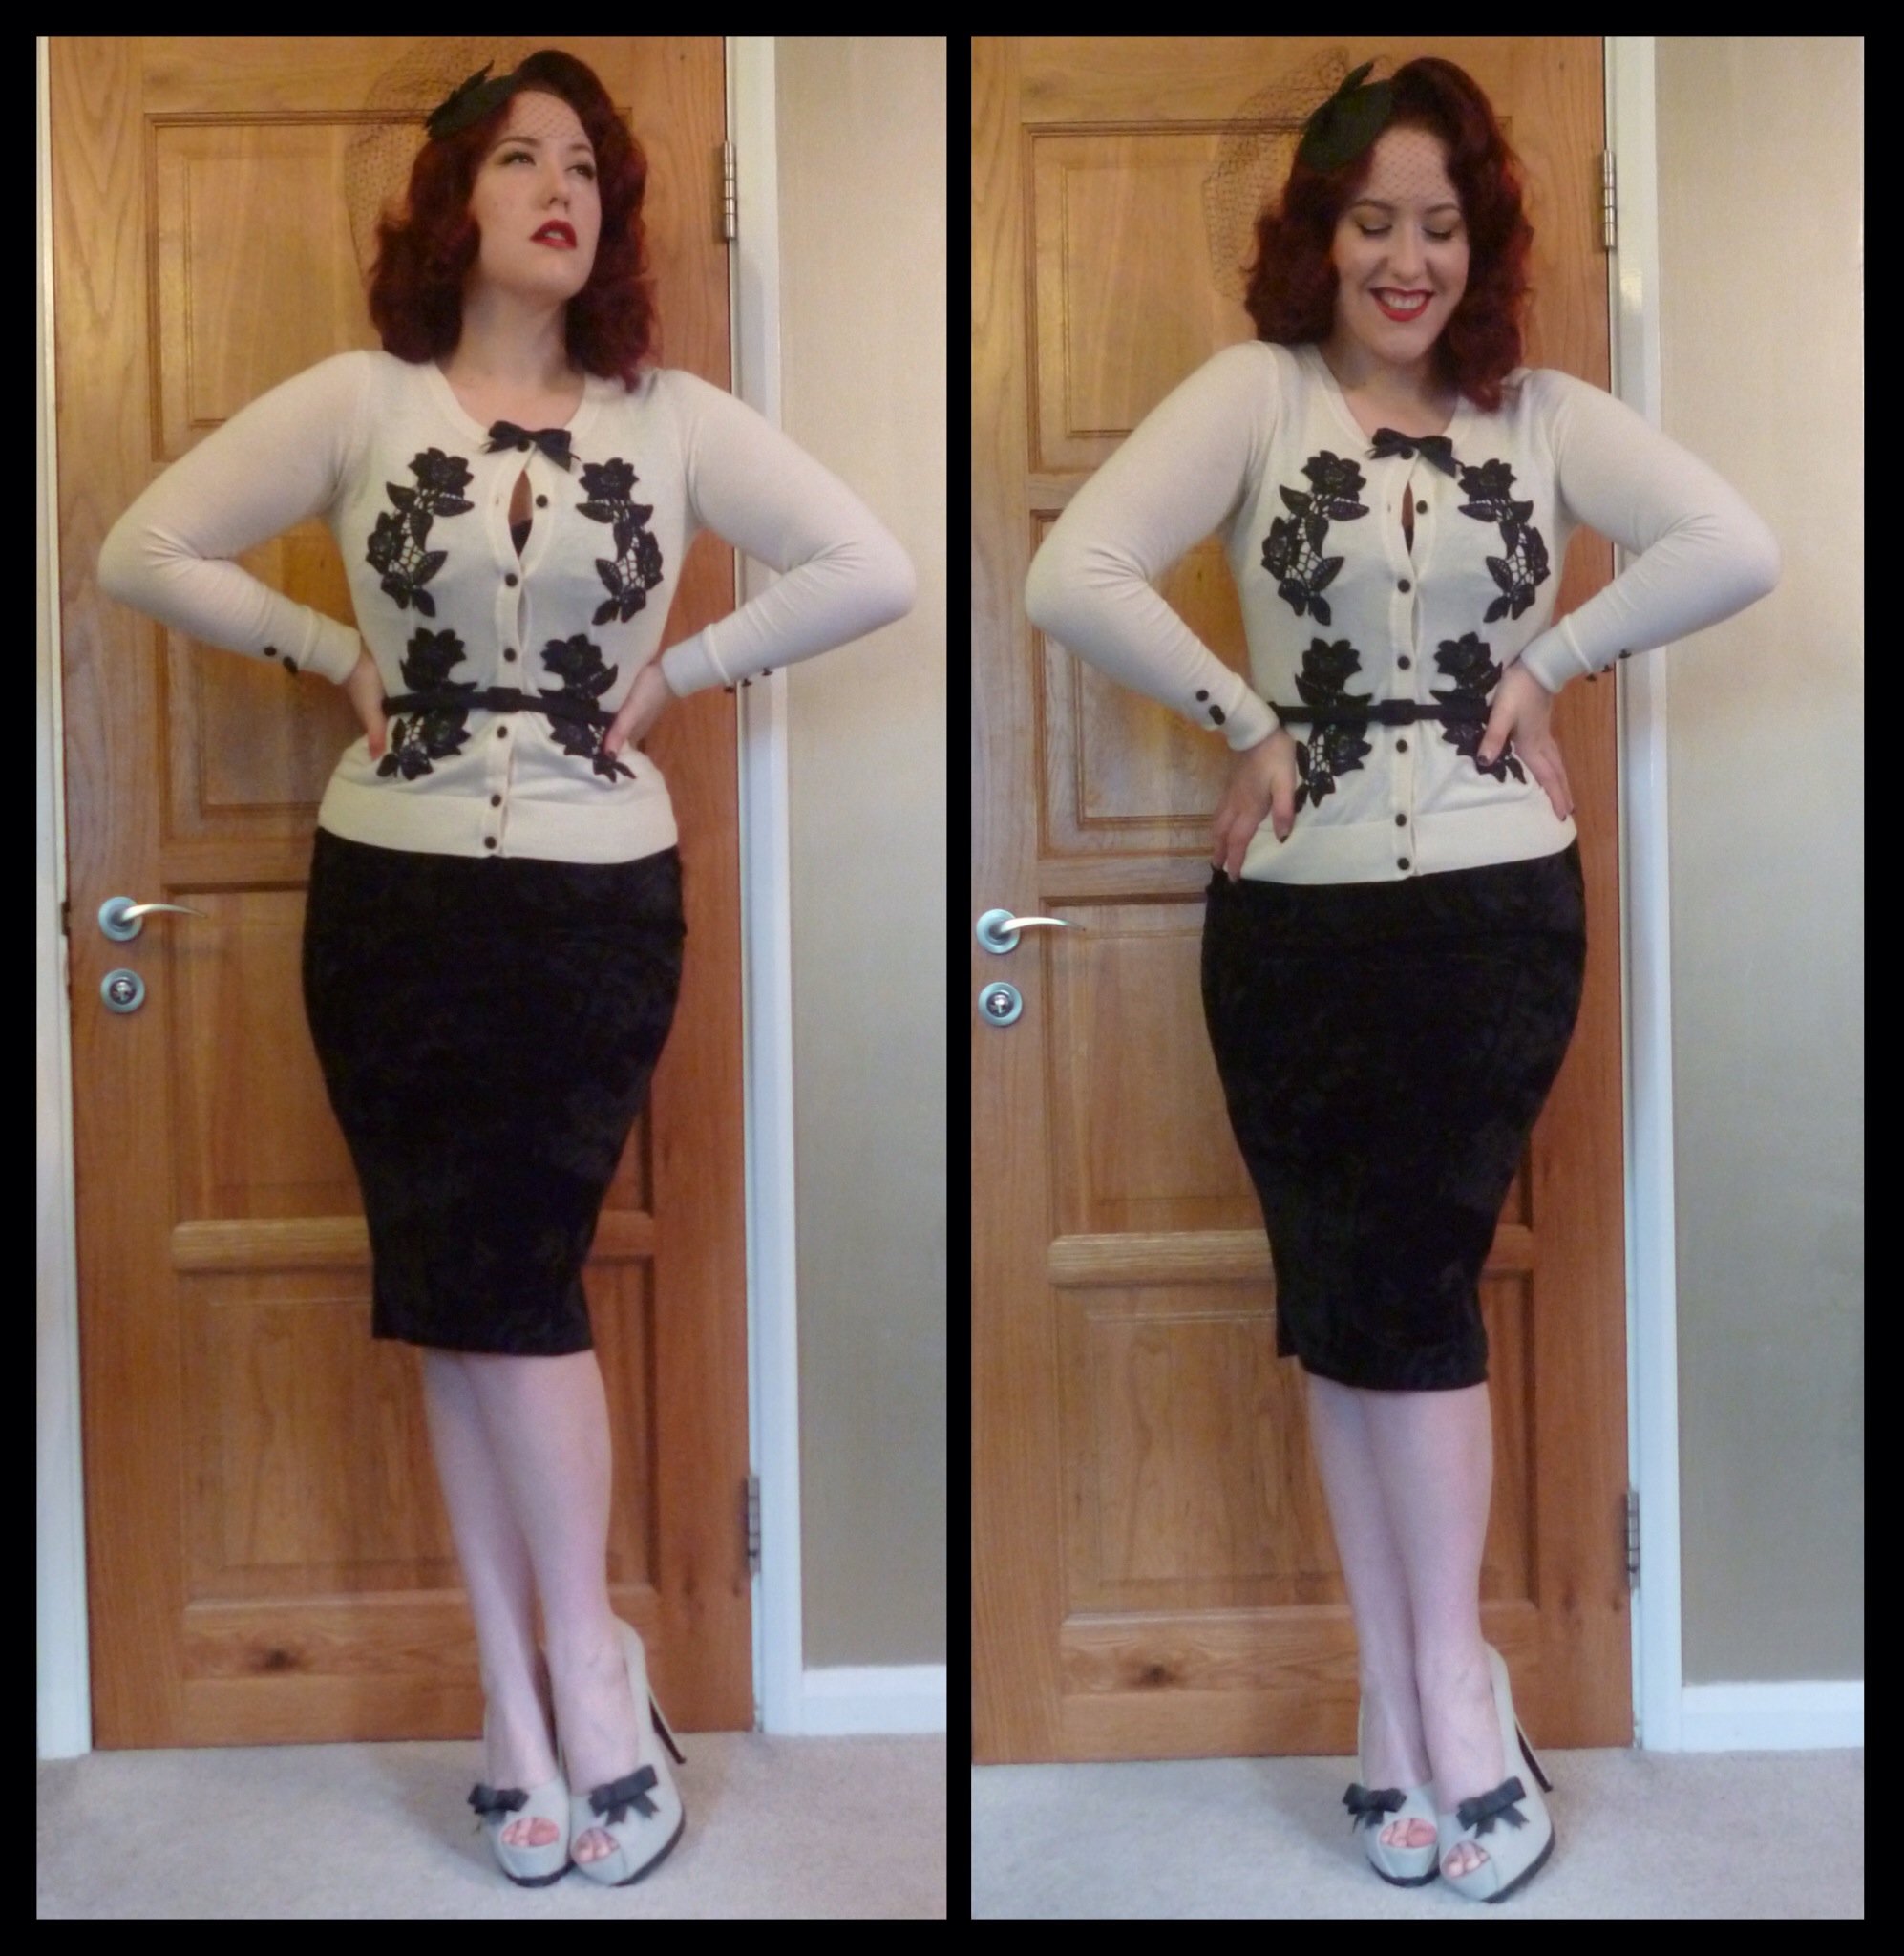
Finished! For less than £20 for buttons, cardigan and appliques all included, and roughly two hours work split across a few days when I had some spare time, I have a very Dita-esque cardigan and over £100 saved to put towards my next car…or, you know, a Pinup Girl Clothing dress–whatever, let’s not split hairs.
My cardigan might not be as luxurious and beautiful as the original cardigan,no doubt, but at a fraction of the cost I don’t feel any buyer’s guilt. And hey, using this same technique I could make myself another 5 colourways for the cost of one of the original cardigans if I felt like it. That’s alright by me.


This is so adorable! I usually add patches to plain cardigans, but this applique idea is gorgeous. If only I could find an inexpensive keyhole cardi!
LikeLike
I know, trying to find a Peter Pan collared one was hard enough, keyhole was even harder. It’s worth looking out for though 🙂
LikeLike
Love this DIY idea, hun! I’ve been dying to find some cute iron-on patches to jazz up my cardigans!
LikeLike
Oh how I wish I was this crafty! This looks splendid!!! P.S. Those shoes!!! Where did you find them 🙂
LikeLike
I made them 😉 lol, the craftiness never ends!
LikeLike
I love how well that turned out…I’ll definitely be trying this with a pink or red cardi!
http://www.veraginvintage.wordpress.com
LikeLiked by 1 person
Having finally bought a Dita cardigan, I think it’s one of the nicest things I own… but it’s definitely a luxury purchase. Your alternative came out so beautiful, I kind of want to do something like this myself!
LikeLike
Pingback: October Outfits Wrap Up | missamymay
Wonderful work dear!! And just to help ya out, I have found these on eBay, not 10p, but the perfect style for just a bit more http://m.ebay.com/itm/Banned-50s-Rockabilly-Plain-Peter-Pan-Collar-Cardigan-Retro-Top-Green-S-M-L-XL-/151989194464?nav=SEARCH
LikeLike
Your cardi has it’s own style… I like it! Me myself made a Dita inspired cardi too… My tecniques were almost the same with yours, except for the collar…. I crocetted a Peter Pan Collar in burgundy & black, to match the color of the cardi which I bought from M&S and the black rose lace appliques… As for the buttons, I change them with black rose bottons. It turn out to be quite good… But eventually, I still bought The Cardi… Anyway, your cardi might trigger me to make another cardi which more flattering than those 2 which I already owned. I like your design! :)<3<3<3
LikeLike