
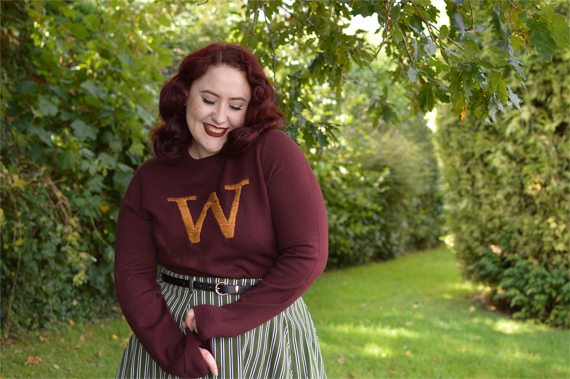
I figure it must be near-impossible for anyone reading my blog not to know by now that I am, yes, a Harry Potter nerd. I mean, if my 4-part vintage style Hogwarts houses series of a couple months back didn’t give it away then I’m just not sure what else would. But in case you need any more hints or Hungarian Horntail-sized clues that I am all about that Potter life, this post should do it; folks, I made myself a Weasley sweater.
I’ve wanted a Weasley jumper for years. There was even an ill-fated attempt at knitting one about 6 years back, when I first learned to knit and was looking for a new challenge after knitting literally everyone I loved the scarf of their choice, whether Hogwarts house striped or regular Muggle style. Of course, if I tell you I didn’t look up a single knitting pattern for how to knit a jumper, or basically any information at all on how one does that, it shouldn’t surprise you that the attempt fizzled. I was actually making it for my younger sister, a natural ginger whose name, Rachel, meant we could exactly recreate Ron’s jumper to relevant perfection. You know, if only I had succeeded. The abandoned unjoined parts are still, I believe, sitting somewhere in my house, sadly bundled in a plastic shopping bag with the remains of the unused maroon wool.
That yearning for a Weasley sweater never went away, though, even after those likely 15+ wasted hours I sunk into the Jumper That Never Was. Recently, the yearning flickered again inside me as autumn began to approach, and I found myself wondering if there wasn’t some easier, quicker, more-cheat-y way to get myself a Weasley sweater…you know, without laying out the £75-200 required to buy an official Warner Bros merch version or to commission a more talented knitter to make one especially for me.
WELL HOLD ON TO YOUR MAGIC PANTS, FOLKS, BECAUSE THERE TOTALLY IS! Cheap-o’s and craft-lovers can rejoice as one to learn that I made my own Weasley jumper for under £20. Which, of course, to you (uh, we,) wizards, is less than 4 galleons, which is pretty good.
Oh yeaaaah, break open the butterbeer, ginger-lovers, it’s time to get crafty! Let’s break down the How To.


HOW TO DO THE DO
Now, I apologise for the lack of true step-by-step pictures; I wasn’t sure my first ever attempt at embroidering was going to work out, so I didn’t expect to end up with a final product I would be blogging about. Still, I did this all alone using guess work, common sense, and only minimal Googling, so with the information below you should be able to manage it for yourself even without specific pictures of every step of the process.
Just please bear in mind I wanted a rustic result and my lack of skills ensured that was the outcome big time, so I know my embroidery is not done correctly, is in places kind of a hot mess, and this is not the kind of process a perfectionist uses. If you want a perfect sweater that’s going to look like you bought it you’re going to have to do the research yourself on how to achieve that result.
You’ll need: a maroon knit jumper, a fabric pen, an embroidery hoop of your desired size (I went for 12 inches,) embroidery thread, a large needle, interfacing (optional.)
Finding the maroon knit jumper is the part of this process that held me back for a couple years. To be most accurate to the portrayal we’re all familiar with from the movies, I wanted it to have a round neck, and I wanted it to be of a medium or fine knit, not one of those sweatshirt fabric jumpers we all had at our Muggle primary schools. I searched on eBay several times and found the sifting process frustrating, although there were some genuine options there. In the end I decided to search the men’s department on New Look, since all the best options I had previously discovered were for men, and there were 2 good results. Since then there’s been another 2 additions, so there’s now 4 maroon jumpers you can choose from to potentially use:
- Burgundy Textured Crew Neck Jumper £14.99 (This is the one I used)
- Burgundy Raglan Sleeve Ribbed Jumper £22.99
- Burgundy Stitch Knitted Jumper £19.99
- Burgundy Crew Neck Jumper £17.99
That last one is available in all the house colours, so while technically Weasley jumpers were worn by only Gryffindors in the books/movies, Ron’s jumper was only maroon because Mrs Weasley always made/gave him maroon coloured things, despite his complaints. So, you can really make your jumper in any colour you like and it would still fit with canon. Just think how cool an emerald green jumper would look with silver embroidery if you’re repping Slytherin!
Sizing: I wasn’t entirely sure what size to buy since these are men’s jumpers, so I studied the size chart and thought about what kind of fit I wanted. I didn’t want a skin-tight fit, as I knew that would make me uncomfortable if I wore the jumper with basic bootcut jeans if I was, say, running errands in public, but it was also important the fit wasn’t too baggy to work tucked in with my swing skirts on pinned up days. In the end I went with the L and it fell into that fit middleground that I wanted.
Money saving tip: When I ordered my jumper I did so using the Honey extension in my browser on my computer, which ran all available codes for New Look and found me a 15% off code that saved me a little money. That extension works on most websites and can save you money on almost everything you order online, so it’s a useful tool if you’re an online shopping addict.

Outlining my W initial using my flimsy self-made stencil
I wanted the initial on my jumper to be a W for Weasley, because I’ve never really liked the idea of sporting an ‘A’ for my own name on anything I own. With my jumper in hand, I had to figure out how I was going to produce that W on the jumper. I knew I couldn’t freehand it, and searching online for large letter stencils produced nothing useful. In the end I decided to type a large W in a word document and print it off onto paper to cut out to form my own stencil.
It would have been easier to print it on card, so that’s my first suggestion. I believe I used a font size of around 472 or something similar, but you might have to print off a few options to decide what size you like best because the size of your frame and how baggy your jumper is will affect how big you should make the initial.
Once you’ve chosen the size letter you like best, you’ll want to use a washable fabric pen to trace it onto your jumper–don’t be unprepared for this step like I was, because I had to opt for using a gold eye liner pencil when nothing else in the house qualified as being both washable and visible enough to work. I know, I know. Serious crafters everywhere are cringing.

Initial complete, reference for scale to the rest of the jumper
For reference, this is how my finished outline looked in comparison to the overall size of the jumper. I made sure to try it on before I began embroidering to check that I was happy with the size and positioning of the letter when it was actually on my body, in case my bust made things go a bit Hokey.

12 inch embroidery loop fixed securely over initial, not too tight nor too loose
Next it was time to whack on the embroidery ring. Now, I had read online that adding interfacing to the back (inside) of the jumper would help with the embroidering, but as someone who has no experience with interfacing I decided ehhhhh, how important can that be, I have literally zero experience in this arena, it’ll be fine!
I would, as it happens, recommend you add in the interfacing. From what I understand, it will give you a firmer backing to work with and will stop you potentially stretching out the knit too much, so you won’t accidentally stitch some areas too tight and mess things up for yourself.
With or without interfacing, you’ll need to put your outlined initial inside an embroidery loop that’s large enough to fit it. I went for a 12 inch hoop and that gave me room to spare.
Then, it’s time to start embroidering. I used Anchor stranded cotton/floss in shade 901, and I massively over-ordered by buying 5 bundles on eBay when I only ended up using 2. If, like me, you’ve never embroidered before, then you’ll be surprised to learn that embroidery thread is actually made up of 6 threads twisted together, and you need to untwist the thread to use it.
My suggestion is that you cut off a length of thread that is roughly the length of your entire forearm down to your elbow, then carefully split the end of the floss so that you pull it apart in 2 bundles of 3 threads. Set aside 1 of those thread bundles so you don’t lose it, then thread the other one through your needle and knot the end.
Here’s where my lack of experience embroidering is going to make serious hobbyists cringe. There is a right way to embroider (I can only assume) which I did not do (pretty sure about that, kind of don’t even need to look it up to be sure.) The one thing I knew I had to be careful of was to make sure my stitches couldn’t accidentally be caught by stray pokey-objects when I was wearing the jumper, but since parts of my W would be about an inch wide, that was going to produce quite a large stitch that could potentially be snagged.
My answer to this was to use vertical stitches in the horizontal parts of the W (basically the 2 flats tops at the top of the W) and horizontal stitches throughout the long vertical/diagonal lengths of the W. Even then, rather than perfectly laying each stitch tightly side by side one another, no matter which direction I was sewing in I would make my stitches slightly diagonal by only 1-2mm so that each stitch overlapped the previous stitch on one side eeeever so slightly. That way, the stitches sort of ‘grabbed’ at each other and helped hold one another down in place, so that there was less chance of gaping between stitches in which a stray object could get caught.
There were times that I accidentally pulled my stitches too tight, especially when tying off each length of thread in a knot to begin the next length of thread. You have to be careful when tying off not to pull too tight, as that will pull the fabric tight and create bunching, but also not to knot too loosely, as that will allow your threads to loosen up, which could allow them to be snagged. I know, it’s a difficult balancing act. Try not to be scared, just be aware to take care.
The areas where I pulled the stitches too tight or allowed them to get too loose meant I had to go back over them to repair the issue. I tried a couple times to do a very diagonal stitch in those areas to hold down any loose threads, but then that stitch looked too obvious and I had to place normal horizontal stitches over the top of it to mask it again. If you look closely at the bottom left part of the W in my pictures you can see where I messed that up, so take that as a warning to be more careful yourself. That’s why I think putting interfacing on the back wasn’t such an unnecessary optional step as I took it to be, and if I made another jumper I’d definitely add interfacing to help prevent tightness/looseness issues.
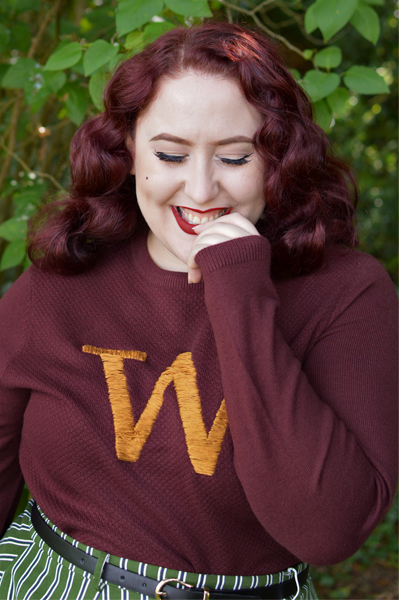
That, basically, is it. I’ll put a close-up below so you can see exactly where I changed the stitches from diagonal to horizontal, and also the areas I messed up.

Click to view details close up
And there we have it. My Weasley jumper is very clearly exceptionally far from perfect, but given I made it for under £20, in probably 3-5 hours, with literally no idea what I was doing, I’m happy with it. Mrs Weasley would definitely applaud me for just giving it a good ol’ try, and that is all that matters to me.
Now, what’s a girl gotta do to get invited to The Burrow for Christmas?

great effort it looks fab!
LikeLiked by 1 person
Wow…just wow! Congrats on a job well done ❤
LikeLiked by 1 person
Thanks lovely! 💕
LikeLiked by 1 person
Looks great. Excellent job
LikeLiked by 1 person
Thank you! 🙂
LikeLiked by 1 person
Great look. Love the burgundy
https://styleofbonnie.com/
LikeLiked by 1 person