

Perfecting your winged eyeliner is one of the most difficult and frustrating things for a new pinup. I first began dressing in vintage styles 7 years ago, but before that my makeup routine only ever included eyeliner when applied as smudged dark brown eyeshadow or very thin gel liner. Needing to master winged eyeliner, therefore, was a whole new challenge for me compared to any other new-pinup who might have been more practised in the skill of applying eyeliner in general.
So I’m going to be honest with you, if you are a winged liner newbie it’s simply going to take some practise and some honest analysing of your results so you can figure out what angle of wing and liner thickness best works for your eye shape. I think that is the part that trips up most new pinups; they see a certain wing shape on someone else and either covet it so much that they’re determined to copy it or they simply believe that is the only ‘right’ way to achieve a cat eye look. That’s not the case–we all have different eye shapes, different amounts of lid space or fold placements (or lack thereof) on our eyelids, different shaped eyebrows, some of us even have eyelids that are a slightly different size and shape to each other (that’s me!) All of those things mean one angle or thickness of winged liner does not work for every person, so be prepared to play around a little to find your best style.
For me, though, there’s a couple things I’ve learned that have helped make my winged liner applications easier and more consistent, and I’m going to share them with you below.
Step 1: You want to start your eyeliner once you’ve already applied your primer and all your shadow work. Mascara is applied after eyeliner, and false lashes put on last if you wear them.

My favourites: Collection Extreme 24hr Felt Pen Liner, ELF Liquid Liner, Makeup Gallery £1 liquid liner from Poundland
Step 2: The first thing I find helps is product selection. When you’ve got the choice of gel liner, felt liner pens and liquid eyeliner, it can be hard to figure out which works best for you for the easiest application and which gives you the result you want. Liquid eyeliner produces the crispest, thinnest lines, but it can be hard to handle for folks unfamiliar with it because it’s so unforgiving. For this reason, I like to recommend minimizing the use of liquid liner to the crafting of the outer wing. For drawing your liner across the bulk of your lid, I recommend using a felt liner pen. I use a cheap £2.99 one readily available in the UK by Collection, but it doesn’t matter too much which kind you use as long as it has a slim nib rather than a chunky one and has reasonable long-lasting power.
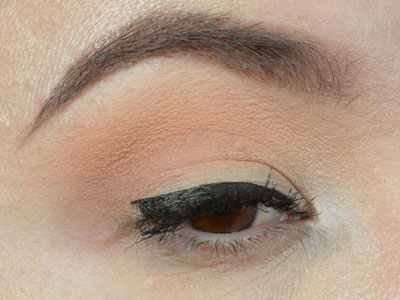
Step 3: Using your felt liner pen, begin to draw a line across your lid against your lash line starting several lashes in from your inner eye. You can go nearer your inner eye if you feel comfortable doing so and it suits your eye shape, but for ladies with small eyes or those who aren’t used to liner, I find starting a short space across your lid and drawing your liner thinly is the easiest and most flattering application. Draw the line across your entire lid towards your outer eye. From the half way point of your eyelid, thicken the line as it moves towards your outer eye. I do this by slanting the pen in my hand so I’m using the length of the pen’s felt tip and not merely the thinnest part of the nib, because that makes it less likely I’ll make mistakes by reducing the number of strokes I need to make to thicken the line. It should look like the picture above before we begin the next step.
Step 4: To work on the wing switch to liquid liner–using a felt pen is possible if you’re very skilled with using one and you’ve found a great quality liner with a very fine nib, but in my experience only the most practised felt pen users are able to get a perfect sharp wing with a pen, hence why I suggest using liquid liner for this part. I either use the $2 Expert Liquid liner from ELF or the Makeup Gallery £1 liner from Poundland as I like the thin consistency of both formulas and their ultra thin brushes–thicker formulas and thicker brushes can both make it harder to control your application of fine details. Remove the liquid liner brush from it’s tube and wipe off some of the excess, as you don’t want a super wet brush.
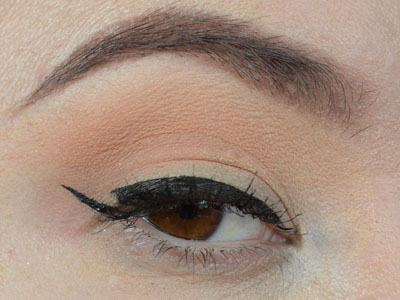 Step 5: Starting from the outer corner of your eye, draw a small line up and out as if following the invisible angle of your lower lash line. If you have a long arch to your brow, as I do, you can angle it towards the end of your eyebrow in a smooth motion to give you a guide to aim for. If you have short eyebrows or your eye shape means you need a flatter or wider angled wing, following your lower lash line is the most reliable way to get a gentle, flattering wing shape.
 Step 6: Join the pointed tip of your wing to the end of the eyeliner on your lid to create a triangle. If you’re worried about making your wing too thick then you can make your wing smaller by creating that triangle further down the flicked line you drew with the liquid liner, then slowly build the wing up with small, careful strokes.

Step 7: Once you’ve created your triangle you can use either the liquid liner or the felt pen to fill it in. Now you should have a lovely liner wing, but you can still use your preferred liner of choice to adjust your wing in small ways to suit your preferences; thickening it, enhancing the curve of the wing, lengthening your wing, or creating a sharper, crisper flick at the tail end of the wing. I used my liquid liner to sharpen the end of my wing below for my finished look.

Finally add mascara, and false lashes (if you want) and you’re done.
That’s it! It’ll take some practise for you to get the hang of it, but hopefully this post has helped you see that different eyeliner formulas and application techniques can make a huge difference in how well you’re able to craft your wing. Just know that even those of us who have been doing this for years will have off-days when we get it totally wrong and have to make corrections or start over–that usually happens on days we have an important event or photoshoot planned, of course!
If you do make a mistake and need to neaten it up or start it over again, either use a makeup eraser pen (like this) or a cotton bud dipped in a little water to remove your mistake. Then simply dry that area carefully with another cotton bud, touch up your eyeshadow if your mistake was on the eyelid, and start again. The same method can even be used to slim out your wing if you made it too thick or got the curvature wrong, and I know a lot of pinups rely on using a cotton bud to perfect their wing every single time they do one. I personally don’t find that necessary with my method, but as with all things, to each their own!
Keep practising and good luck! Please let me know if any of my tips above help 🙂

I’m exactly the person form whom this tutorial has been written! I’ve always wanted to try winged eyeliner, but have never really known where to start. I struggle to follow video tutorials on such things, so a clearly written guide that I can work through at my own pace is ideal. Thank you!
LikeLike
Oh yay! I’m so glad this might be helpful for you. I hope you can develop a wing technique that works for you 🤗
LikeLike
Funny, I’ve been doing winged liner for years now….and sometimes I forget even the basics. Good refresher, I have most certainly gotten too cocky in my application. It’s probably the reason why I have gone back to my woes of the early winged liner days. Thank you lovely Miss Amy May ❤
LikeLike
After writing this last week about how I almost never make mistakes, then managing to apply liner with a poor mirror set up in front of a camera for my IGTV get ready with me, of course I failed completely yesterday and had to actually start over on the wings! Lol. Hadn’t had that happen in months, maybe a year, until then.
LikeLike
LOL isn’t that the way it goes!
LikeLike