
I’ve been learning to sew for 4 months now. Throughout my adult life most of my hyper fixation hobbies have only lasted 3-6 months (word up, knitting and bedazzling!) with blogging as the only long term exception. Like, BIG EXCEPTION. Like, it’s been almost 10 years. And with that in mind, I’m fully aware that sewing posts probably aren’t going to be something all of my readers are interested in, which is totally fine. But I’m really enjoying this newfound and constantly improving skill I’m attempting to acquire, and historically I’ve always been able to share the things I’m excited about with you here on the blog. And I’m excited about this!
I’m trying to work my way up to making one specific dress. A sheer leopard print chiffon maxi gown. Will it be drapey a bit like a kaftan or will it be a wrap dress? I haven’t decided yet! But I know it will be full length, and I know chiffon is tricky to sew with, and I know I might even need to draft my own pattern to create what I really want. That means it will be A Journey, for sure. And I’d like to document that. So, much like I do with my outfit posts, I’ve decided I’m going to start doing the occasional wrap up post with photos and a short description of each of my projects as I work my way through learning new sewing techniques, working with new fabrics, and figuring out exactly what I want on my way to my Dream Dress. Occasional posts will be easy to skip for those of you who only want beauty and repro clothing reviews, and they’ll hopefully prove to be a handy little diary for both myself and those interested in watching me (hopefully!) improve. So here they are, all my projects from May 8th to August 20th of 2023 as I’ve begun learning to sew.
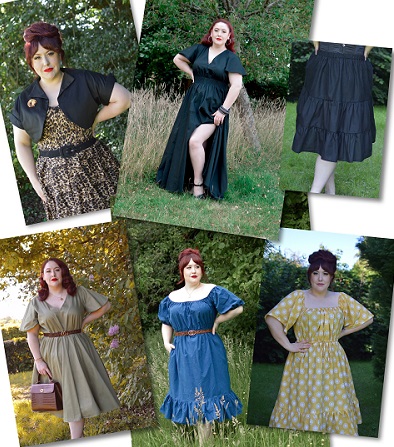
Project 1 – The Popover dress from Gertie Sews Jiffy Dresses


I wrote a full blog post about this baby in my glee of completing my first ever Proper Sewing Project, so you can read about it in full here. But in summary, I started with a bang, made some mistakes—like pockets sized for a small child and not sewing the hem correctly—but in the end I did, in fact, produce a dress that is technically wearable.
Pattern hacks: I added pockets and flutter sleeves.
New skills learned: literally everything.
Project 2 – Navy Peasant dress


I got kind of cocky with my Second Ever Project and decided, sure, I could just draft my own pattern of a dress I already own, right? I actually could, shockingly, although I did draft the sleeves at a weird angle because I had to pull the sleeves flat both top and bottom on the dress I was using as a template, and turns out I didn’t fully stretch them out. As a result, I ended up with a weird angle that didn’t hem easily nor allow me to create the tube needed for the elastic to run around the entire neckline and shoulders. I’d bought enough fabric to account for mistakes, though, so I just adjusted my pattern, made new sleeves, and all was well.
Pattern hacks: I just straight up traced a dress I already owned to the best of my ability considering it was elasticated at 3 vital points.
New skills: using elastic, both in a tube and stitched directly to the waistline. First time creating a pattern, admittedly not from scratch. Gathering, though I have done this several times in the past each time I decided I wanted to learn to sew and then immediately gave up.
Improved skills: My pockets were actually useable this time!
Project 3 – The Nighty Of Which We Do Not Speak
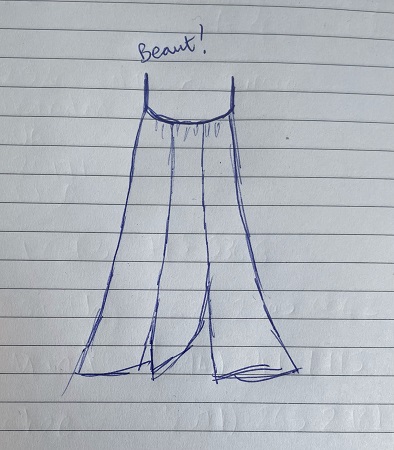
You can’t see photos of this project because it was such a disaster that I am too ashamed to provide photo evidence of it. Long story short, I was high on my own supply at this point and decided I could copy a basic satiny shift I own, but in cotton so I could wear it to sleep when it’s hot. The things I VERY STUPIDLY did not do were numerous—namely, I did not pin my existing shift to my fabric, instead only drawing around it vaguely, making no allowances for seams; I didn’t take into account the fact that it was a satin fabric cut on the bias but my fabric was a non-stretch cotton; I also didn’t even bother to ensure the shift was laying entirely flat upon the fabric I was tracing it onto. To compound these many mistakes, at no point did I measure my haphazard outline, nor even hold the pieces up to my body before I cut, or before FRENCH SEAMED THE PIECES TOGETHER.
Full of pride and smug in my clearly superb skill—because HELLO, I had French Seamed this sucker—I went to try it on for the first time before attaching straps, only to find that, uh oh, putting it on over my head meant I was getting stuck around the elbows. I was unwilling to eat the cost of the (admittedly inexpensive) fabric, especially since it was really hot and I needed a nighty, so I decided I’d have to cut it in half straight down the middle and insert a panel at the front and the back. Problem was, I had only bought 1 metre of fabric. I had mostly unusable scraps leftover that would not make panels that were the same length as the nighty. Sooo, ya girl now owns a French seamed floral print cotton nighty that has full Frankenstein’s monster vibes, because the thigh area at the front has a slit on each side, one side of which is curved along one edge, because there wasn’t enough straight fabric left, and at the back there is only a teeny tiny slit on one side, again, because the fabric wasn’t quite wide enough for the full length. Please enjoy my exquisitely hand drawn depiction of my comfortable monstrosity, above.
Pattern hacks: HACK JOB, YOU MEAN,
New skills: French seaming.
Improved skills: Truly understanding now that I am an idiotic, fallible creature who is not A Special Special Clever Girl and who does, in fact, need to measure twice and cut once just like everyone else, and should also probably not just fucking wing it simply because an item looks simple.
Project 4 – Yellow Peasant dress, The Remix


I live in peasant dresses when it’s hot (are they called milkmaid dresses now btw? Is that just a trendy new name because of Gen Z or am I legit accidentally slurring right now? I’m so serious, I tried to Google it. Help!) As such, I decided to make my navy peasant dress again from a printed cotton duvet cover I bought expressly for the fabric, but with a couple adjustments to make it even cooler, temperature-wise.
Pattern hacks: I switched out the elasticated waist for a drawstring, and left the elastic out of the elbows of the sleeves so they would just be big breezy, breezy bois for max airflow on heatwave days. I also made the skirt a little wider at the hips and made the bottom ruffle slightly deeper.
New skills: first time making a drawstring, baby! I made the hella long waist tie myself after debating whether to just cheat by buying bias tape, and fashioned the drawstring channel.
Improved skills: I was definitely sewing straighter lines by this point and had got much faster, because the machine no longer scared me.
Project 5 – Popover dress again, but make it Maxi!


This project was actually kind of simultaneous with project 4, because I started the yellow peasant first but then paused halfway through making it when I decided it made sense to cut the fabric for this maxi popover dress on a day I had intended to keep sewing 4…and then I accidentally just got more exited about the maxi instead and finished that first. I kept going back and forth about whether I wanted to leave it loose to be belted as the original popover was intended, or whether to shir the waist. I wore it once belted and then decided the shirring would make for a better fit, so away I went! The shirring lines as printed on the pattern from the Jiffy Sews book were weirdly high for me, like, so high my mum and I felt they must surely be a mistake?? So I dropped it down towards my natural waist and sewed each line individually, because I was too scared to shir in a spiral.
Pattern hacks: A bunch! I added pockets and flutter sleeves again just as I did with my first Popover, but I also lengthened it to maxi length, leaving a front slit, and extended the back for full coverage instead of leaving it as a V back.
New skills: I didn’t technically learn any new sewing skills with this one, but there was a bit of brain testing and some tweaking to get the full back to work, and for the slit to not look weird where it switched from the two pieces being sewn together to then needing to be hemmed along the slit.
Project 6 – Cotton petticoat


The thing about blogging is you have to shoot autumn/winter items from August onwards and spring/summer from February onwards. That means I’m often sweating it up in August trying to get blog photos, and let’s face it, with global warming our British summers are becoming hotter too. Sometimes this means I’d like to still have a bit of volume under the skirt of a dress but I don’t really want all the stuffy layers of a tulle petticoat, especially since they are basically plastic. So I decided to make myself a basic petticoat in cotton so I could get a little lift around the legs when it’s warm without overheating. I French seamed the entire thing and used bias binding, so from the inside this was the neatest thing I had made thus far.
Pattern hacks: I just made the whole thing from scratch without a pattern. I started by making the first tier 1.5 times the size of my waist so it would gather when I put the elastic waistband in, then multiplied each layer by 1.52 because that’s how much my gathering foot gathers when I have the tension set to 8 and the stitch length on 4.
New skills: Using thick elastic for the waistband. I used bias binding for the first time to encapsulate the gathered edges of each tier.
Project 7 – Dorothy Bolero by Charm Patterns


After making several stretchy or roomy pieces, I knew I would have to start making fitted or structured items so I could continue to improve my skills. I made this bolero in the same black cotton sateen I’d used for my maxi dress, opting to make the winged collar and cuffed version, as this pattern has several variations. This was my first time making a lined item, and it went okay. As in, it is wearable and I’ll get use out of it, but technically I did fuck up because at the point where I was supposed to be understitching the outer edge of the bolero by slipping the lining and outer onto the arm of my sewing machine separately through thr sleeve openings, I got distracted asking my mum if she could see in the pattern instructions where it told me how to finish the sleeves. (I still can’t see that?!) After we agreed together on a way I could do it, I ploughed ahead and began pinning the sleeve lining to the outer, then stitched them in place before realising…whoops, I didn’t understitch everything like I was supposed to before the sleeves were finished. I couldn’t be bothered to undo the sleeves and decided that if the bolero looked out of shape after washing then it wouldn’t bother me to stitch along the entire hemline 3mm from the edge in future just to secure everything, if need be. It’s not like the black stitching on black fabric will be super noticeable.
Pattern hacks: None. I did exactly what I was supposed to, except for the parts where I forgot and actually didn’t. Whoops!
New skills: First time lining an item and bagging it out!
And that’s it! I very confidently started a lace version of the Dorothy bolero yesterday, presuming it would be the work of only an hour or so since it would be a sheer unlined item. Yes, I can hear you all laughing now. My god, lace is a little bitch! Stay-stitching the neckline went fine with a little tissue paper laid underneath my lace, but as soon as I tried to start French seaming under the first arm, even with the tissue paper, my machine decided it was time to start eating. I ordered some water soluable stabiliser today which I’m hoping will allow me to work on the rest of the bolero without having to resort to hand stitching the whole thing, which is what I’ve done so far for the French seams under both arms. If you have any tips for sewing lace or other delicate fabrics, please do leave me a comment!
After I’ve battled the lace, I’m hoping to move on to chiffon, polyester crepe, making a maxi wrap dress, and perhaps even deciding on the exact dress shape I want to use for my Dream Leopard Dress. Wish me luck!
