
I’ve been on a bit of a bangle buying binge this year, which has resulted in my former bangle stands becoming obsolete. So, I moved all my bangles to the 3 small drawers at the top of my dresser…and then found they outgrew that within a couple months too. Suddenly, I needed a lot of storage, and preferably cheaply.
Every bangle stand I found online cost £20-50, and with the number of bangles I have I’d need at least 3. Plus I needed my stand(s) to be wall-mounted or vertically free standing, which really narrowed down my options. Finally I decided to get creative and make the rack I was envisioning, and I’m pleased to tell you it was easy and cheap.

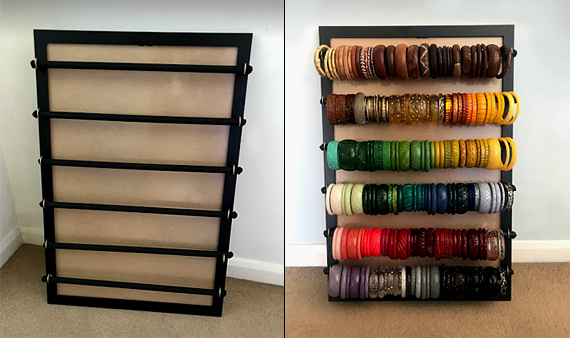
The basis for my rack is a large picture frame. I measured the empty space on my wall where I wanted it to go and ordered the biggest size that would fit, which was 30 x 20 inches, costing £12 on eBay. Next I popped to Wickes (a hardware store chain, for non-UK readers) to buy some wooden dowels and shouldered cup hooked screws to make the bangle rods and the hooks that would support them.
Now, if presentation is more important to you than it is to me, or if expense isn’t an issue, then you can scout out a beautiful picture frame and even forego making your own rods by sourcing small, pretty curtain rods or something similar to take their place. No matter what you choose, you’ll probably need to buy something that has knobs on the ends to stop your rods from slipping out through the hooks, or be prepared to find knobs you can attach yourself. I went the cheap and easy route with that bit too by using a glue gun instead.
While the whole project is very simple to make, you’ll need to consider the size of everything before you start buying. The frame will obviously need to fit the space you intend for it to hang or lean, but if you’re making a large rack like I did then your rods will need to be thick enough to be able to hold all the bangles (which are surprisingly heavy in large quantities) without bowing or snapping. If your rods are thick then you’ll need to source shouldered cup hooks that have a large enough opening in the hook that the rods can slip in and out easily. Basically, get your measuring tape out and put on your logistics hat.
What you’ll need:
- A picture frame
- Wooden dowels
- Shouldered cup hook screws
- Optional:
– A glue gun or knobs you can attach
– Paint and/or varnish - Tools:
– A hand drill
– A junior hacksaw (if you’re cutting your dowels to size)
– Ruler or tape measure
– Pencil or pen (to mark the spots for the screws)

The construction really is as easy as the picture suggests it would be. Most of the real work comes in the pre-planning you need to do before you make your purchases, measuring where you intend to hang/lean your rack and deciding how many rows you want or need. If you wear larger sized bangles make sure to take that into account when measuring out the spacing between your hooks, as you don’t want your rods to be grouped too close together for your bangles to hang properly.
Directions
- Measure out the spacing of where your hooks need to go and mark their places with a dot.
- If the wood of your frame is too hard to screw the hooks in by hand, as mine was, you’ll need to use a very slim drillbit to drill a small hole using a handheld/electric drill. Then you can screw the hooks in by hand.
- Once the hooks are in place, measure how long you need to cut your dowels to fit. Remember to make the rods a little longer than the placement of the hooks so they don’t easily slide out of them.
- Attach any knobs you may have bought to the end of your rods, or else use a glue gun to add textured baubles to the ends of each rod so that they work as stoppers that prevent your rods sliding out of the hooks.
- Paint your rods, if desired. I painted mine in a matt black then added a layer of sprayed varnish so the paint wouldn’t get scuffed sliding in and out of the hooks.
- Optional step: You can also paint or use wallpaper/wrapping paper to decorate the back of your picture frame..
- Slot your rods into place. You’re done!
When I made my rack the drilling, screwing and dowel sawing took less than 10 minutes. It was using the glue gun to add the stoppers to the end of the rods and then painting/varnishing the rods that took longer, because I had to give the glue and then the paint time to dry between coats and before turning each rod over (I worked on them standing in a large vase) to do the other end. All in all though, with drying time removed, active work on this project must have been less than an hour.
It cost less than £25 and holds 190 bangles of assorted sizes!

Damn girl! That is quite literally the most beautiful collection! A rainbow of options! For now, a 3 tier tabletop one I got fairly cheap on Amazon does the trick for me but this is GOALS!
LikeLike
Haha once upon a time a 3 tier rack worked fine for me too…then the 5 tier wasn’t big enough, and since then it’s all been a bit of a storage struggle! St least I’m sorted now (until I buy more!)
LikeLike
Pingback: Spring Florals [Splendette] | Miss Amy May