
I don’t know how to sew. I would have loved to have been offered Textiles as a subject in school, like my younger sister was, but alas, instead my tech selection was Food Technology. During my childhood on the farm our family consisted of 3 adults and 5 children, so my mum was kept plenty busy running such a full household–as a result she taught me the absolute basics of mending when it was necessary, but I never had an interest in learning the skill in earnest. I could never even produce a straight backstitch, so I found the whole thing frustrating and generally avoided it when I could. Fast forward to my 20s, I realised knowing how to sew properly would’ve been a very useful skill to have, sewing machine and all. That notion has haunted me for the entire 10 years I’ve been dressing in vintage style clothing, and finally this year I decided to do something about it. Not by undertaking any sensible measures like signing up for a sewing class, of course. No, I grabbed Gertie Sews Jiffy Dresses and decided the Popover dress was as good a place to start as any.

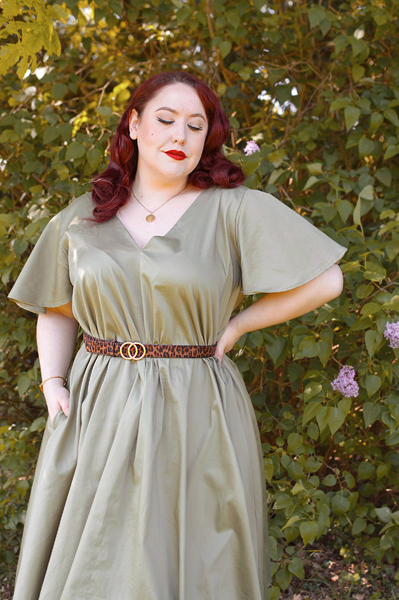


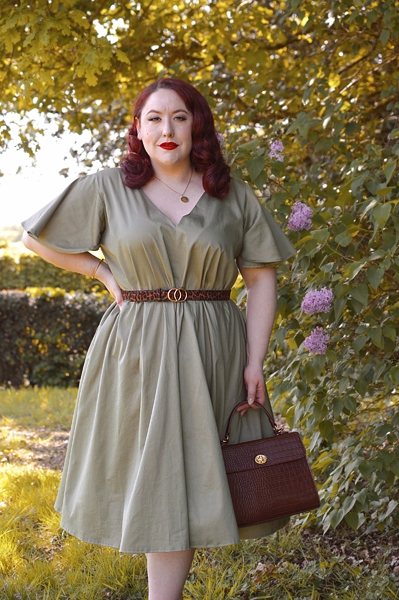


 Dress: Popover dress made by me from the Gertie Sews Jiffy Dresses book
Belt: Old New Look
Bag: Caffe Versailles handbag by Charlie Stone Shoes
The reality is Gertie does suggest you get comfortable with a sewing machine (which I have access to via my mum) before you attempt your first project. Over the past 10 years I have 2 or 3 times half-heartedly attempted sewing, usually by asking my mum to run me through the basics of how a sewing machine works and then attempting to make something very simple without a pattern. Once I did successfully make a dirndl skirt, though the word ‘successfully’ is glossing over the hash I made of adding the zip, the wonky placement of the pattern across the waistband, and the dubious tab I created topped with hook and bars in an attempt to cover over the aforementioned botchily added zip.
My last attempt at any such project was several years back, so I watched a few YouTube videos to refresh myself on how to thread a bobbin, then grabbed an old dress that doesn’t fit anymore and wasn’t worth reselling. Chop chop chop, I turned it into an apron with a gathered skirt so it would adequately cover my swing dresses on the occasions I cook while pinned up. I had no pattern for the apron so I just winged it, knowing how gathered skirts are made and using the existing waist ties from the dress as the waistband. It’s not a perfect result, with front seams where I would rather there be none, as the easiest way to utilise the fabric I had necessitated that placement. But it doesn’t need to be perfect. It needs to cover my full skirts and the front of my bodice when cooking at home around family and friends, and it was intended mostly as a way for me to get used to using a sewing machine. I did. I also learned why my thread kept nesting, and hopefully will be able to avoid that in future for the most part because oh my god that is the worst.
Which brings us to the Popover dress. I chose it mostly because I adore my Deadly is the Female Claudia dresses so much—one-size dresses and gowns that have a distinctly choir-robe look to them until you add a belt and suddenly become a femme fatale. I’ve wanted one in sheer leopard print for ages, just as I also coveted the Wax Poetic Lydia gown in sheer leopard, which I missed out on in my size. Well, I can make something somewhere between the two, I decided! A Popover dress, lengthened, with either bishop or flutter sleeves. But before I got quite that ambitious, a standard Popover dress in cotton sateen seemed like a good place to start–plus, a quick conversation with my mum was enough to warn me off knitted and woven fabrics for a while, because apparently those are some tricky bitches.
Well, I say a standard Popover dress…I still decided I want to add sleeves to my first attempt. Oh, and pockets. All dresses should have pockets; I complain when companies don’t add them, shouldn’t I do so when given the chance?
It turns out that altering a pattern when you’ve never before followed a pattern and don’t even HAVE a pattern for your additions is kind of thorny. It wasn’t actually hard to add those two things once I had patterns for them, it just took some time to research how best I could make flutter sleeves that would have the shape I wanted while correctly affixing to the shape of the armhole on this specific dress.
Most of the DIY patterns I found on blogs and YouTube told me how to turn an existing sleeve pattern into a flutter sleeve, but the Popover dress doesn’t come with sleeves as a variation option. So, I was working from scratch. I, a non-sewer, a pattern novice, who has never once made a sleeve of any description. My mum knows how to sew but almost never does it, and probably last made a piece of clothing in or before my childhood, so asking her for help usually means we try to suss out a problem together using only common sense and one of her vague memories. I told her my idea for achieving the sleeves but she was doubtful, which sent me on the above hunt for a free sleeve pattern that would work. She seemed to find them all suspect. Even looking at dresses I own that have flutter sleeves didn’t appear to convince her that any one route would result in success. In the end, I reverted to my original idea: I measured the armholes on the finished dress and used that as the diameter measurement to draw a semi circle. I’m sure there is probably a technically better way to do this that results in a more finessed sleeve, but this was simple, I was happy with the shape it created, and affixing sleeves almost melted my brain (omg sleeve seams suck!) so I’m okay with the end result.
The pockets were easier. I found a pattern on Scribd, made it slightly bigger, and looked up on YouTube how you attach a pocket into a sideseam, because my dumb brain kept saying ‘just sew it in as you sew the side seams together’ as if that wouldn’t produce a fully sealed pocket accessible to no-one. NO, BRAIN, THAT IS STUPID, STOP THINKING THAT.
It should be noted that while I say the ‘pockets were easier’ the caveat is a massive ‘only in theory, because I fucked them up.’ I don’t even know why, but for some reason when I followed the video I decided the opening on my pocket pattern would be too big so I made it only as big as my hand’s actual (but not remotely splayed!) measurement, which means my shoddy beginner’s sewing skills resulted in an opening even smaller than intended, AND I forgot that, you know, hands flex and move and even swell with heat. So the pocket, while technically complete, and even under-stitched…would be perfectly sized for one of my nieces, but not so much for me, whose adult hands are twice their size.
I was so disheartened by my mistake that I didn’t bother to put in a properly sized second pocket, deciding I could go back later to do so and to fix the first pocket. At this point, this one-day-make had spilled across 4 or 5 days of dipping in and out of sewing and researching for my additions, so I just wanted it done. I shortened the shoulder straps (twice) as they kept slipping off my shoulders, sewed on the aforementioned sleeves, and hemmed the dress—incorrectly. My mum wasn’t around when I did this final step and I hadn’t watched Gertie’s How To video until the very end, so I treated the hem the same as I did all the other seams (minus the sleeve hems) and cut it down with pinking shears after sewing, rather than sewing a rolled hem. My mum pointed out this mistake as soon as she inspected my proudly presented finished product, so I mentally noted for future projects that That Is Not How You Sew Hems, Duh. I should have been able to figure this out myself considering I deduced the sleeves needed rolled hems without even knowing that was the correct term for what I was doing to them instinctively, but alas, I think I was so eager to just get the dress finished that the idea of having to roll hem so much fabric made my subconscious cry and it instead told me to pink it up, bebeh!
Finishing the dress, even though it was clearly imperfect, was almost euphoric. I was really proud of myself for making something, especially since the notion of sewing has intimidated me for years, and it felt good knowing I had produced an item I could reasonably wear. That being said, by the time this dress was complete I felt a bit drained of enthusiasm for the project, so I suspected it would probably be a few weeks before I started another project, especially since I felt a bit dejected realising how far away my dream leopard chiffon dress would be from being made if I expected to make it, you know, well. But weirdly, within a couple days I found myself craving a new project and daydreaming about what would be a sensible next item for me to sew that would help me improve my skills while also resulting in a piece of clothing I was excited to wear. I’m not sure if anyone would be particularly interested if I continued to share my sewing journey here on the blog, but needless to say I’ve ordered several different fabrics and patterns ready for my next sew.
For the Popover dress, this is the end result. I certainly could have sized down and in future I will, as I think that’s why I was having trouble getting the straps to sit on my shoulders securely. The armholes in this bigger size are fine but if I size down on my next project I have a feeling I might have to adjust the armholes, so this is a note to myself about that. I’ll be following this YouTube video instead for future pockets, as well as deepening the pockets pattern I used because, hell, pockets can never be too big. (Spoiler alert: I’ve actually since made pockets using this video technique and it was super easy!) I’ll obviously be hemming all future projects correctly, and I want to give French seams a go soon too. I haven’t decided what colour or fabric I want to use to make this dress in full a length, but that’s definitely on my To Make list now, possibly leaving a slight centre slit on the front seam and perhaps creating a gentle curve leading into it for ease of walking with all that fabric. Since making the Popover full length would lead to A LOT of fabric at the hem level, I might decrease the steepness of the angle of the skirt leading out from the armholes so that there’s less fabric around my feet—yes, I will make sure to check the fit through my bust before I do that though, especially considering I’ll be sizing down.
All in all, I made some mistakes and learned how not to make them again, which I think is the most important part. I’m pleased with myself, because I often want to quit things I’m not immediately good at, and after years of wanting to sew I finally accepted the smart way to do it was to begin somewhere easy and achievable, rather than to throw myself into it spontaneously with a vague idea, expecting great results and inevitably being disappointed. I’ve always respected that sewing is difficult, but I let that intimidate me out of giving it an earnest try, rather than simply approaching a beginner’s level project with an open mind and patience.
Also, I maybe have the sewing bug now?? It’ll be interesting to know whether you would care to read any future posts about other things I make, not as a shift of focus here on the blog, just as an addition. Knowing my attention span and impatience, however, I’m not convinced this is suddenly going to become a long term obsession. For now I just want to make stuff that excites me and try to improve my accuracy and neatness, because those two things are not personal strong suits of mine. If you have any general tips for beginners, please feel free to leave me a comment below! I’d love to hear any tricks, encouragements or tidbits that will help me improve.
____________________________________________________
COVID-19 NOTE: These pictures were taken alone and safely in a secluded outdoors area, practising strict social distancing measures in an effort to help reduce the spread of Covid-19.

This looks great! I clicked like “aight where do I buy this” before I started reading properly. You’re right to be proud of yourself, that’s amazing to make from scratch for your first time!
LikeLike
Thank yooou! 🥰 I’ve definitely got the sewing bug, just finished my second dress and am working on my third
LikeLike
I only just read this post; and I’m so impressed!! I applaud your ambition level – sleeves, pockets, size customizations – despite your lack of prior sewing skills (even if it may have left you disheartened at stages of the process). Would definitely be interested to read about more of your sewing adventures!
LikeLike
Thank you! 🥰 My ambition wasn’t totally trampled by this first project because for some reason I decided to draft my own pattern of a dress I already own to make it in a new colour as my second project 😂 shockingly, it worked! I’ve since made it in another colour, plus a couple other little projects, before returning to this Popover dress to make it again in black, in full length, with a shirred waist.
I know I’ve scaled back on the blogging massively over the last few years, and now that I’ve been sewing on weekends more often than blogging I’m writing even less. But it might be nice to do occasional summary posts showing pics of my latest makes and writing a small bit about each, so those interested can see how I’m progressing, but long term readers who aren’t interested in that topic don’t have to skip over tons of posts.
LikeLike
Pingback: My Sewing Journey [Projects 1-7] | Miss Amy May