
I am no pincurls expert. I want to state that right now. But I have been attempting to master pincurls for over a year now, as well as other wetset and hotset methods of retro styling one’s hair, so I’ve learned a few things. I’ll be including videos at the bottom of this post showing you how true pincurling experts roll their tresses, the same videos that I watched to figure out how to do it when I first started venturing into pinup style. Despite being no master at vintage hair, I’ve still been asked multiple times on my Instagram to do my own tutorial on pincurling, and finally I decided that perhaps I do have something to offer on this subject; not my expertise, but my lack of it. The thing about learning to pincurl your hair is that it’s tricky, it takes time and practise, and at the beginning it can leave you frustrated and make your arms ache. Even now, a year on, I don’t roll the neatest pincurls, but I want to show you that it’s still possible to get a pretty and passable ‘do out of a less than perfect wetset.
For true beginners please note that an overnight wetset is not the only option for achieving vintage waves. There are also foam rollers, which are easier to apply but can have varying results, and may also take a bit of practice. For ladies who have serious humidity and frizz problems with their hair they can hotset their hair. There’s several options for this, including hot rollers, hot sticks, and also heated pincurls, where you use heated curling tongs to create the curl that is created by hand in the winding process of wetset pincurls, then secured in the same way as wet pincurls as an elevated or flat pincurl. These pincurls created by heat ought to be fixed with a light layer of hairspray and can be left overnight to set firmly into hair the same as with pincurls, but if being done on the day of an event then they must at least be left to cool completely before being taken out and brushed through.
First of all you should know what kind of things you’ll need. For the actual wetset you will need 1) A comb, 2) one or two sectioning clips, 3) an implement to easily section and part your hair, such as a rat’s tail comb/teasing brush, 4) setting lotion, 5) a silk , satin or nylon headscarf, and 6) pincurl clips. I got mine on eBay, a pack of 50 so that I have plenty even after losing some, though a full head of thick hair might even use all of these. Personally I prefer the clips that have a slight curve to them because they fit more comfortably against the curvature of the skull, making them more comfortable to sleep in. Optional extra: Argan Oil.
Finding the right setting lotion that works for your hair can be a trial and error process. They can leave your hair crunchy if you overapply or the lotion is especially strong hold, while others don’t hold strongly enough. I personally love Motions At Home Foaming Wrap Lotion. It has a good hold but also leaves your hair feeling soft and non-crunchy. It’s reasonably priced and easy to get a hold of online. I get mine from Amazon. But there are other setting lotion options, of course, and feel free to look up reviews on other lotions popular among the pinup community. Please note that setting lotions are quite hard on the hair over time, so incorporating an intensive conditioner treatment into your weekly haircare routine is a good idea, and you might also consider applying Argan oil to your hair before you apply the setting lotion to give your tresses a little extra nourishment and care.
There are two types of pincurls, elevated pincurls and flat. The difference is exactly as you would imagine: for elevated pincurls the curl stands elevated from your scalp, and in flat pincurls the curl is clipped flat to the scalp. I’ll show you how to do both. You can decide after some practice which type you prefer, and consequently do your full of head in only that style. Elevated pincurls will dry faster because air circulates through them easily, and they also provide more volume because the hair dries elevated at the root. You might find like me, however, that depending upon how you sleep elevated pincurls may get smooshed during the night, and so flat pincurls are your safer option for keeping your curls in their round form and unmussed.
There are different setting patterns–a setting pattern refers to the direction in which your create your curl, hair rolled up towards the head or under towards the head, and also referring to the direction you create that curl, either forward towards the face or towards the back of your head when talking about flat pincurls, or with the roll of the curl directed towards either ear when talking about elevated pincurls. Different patterns will create different wave formations, but I am definitely out of my depth in advising specific patterns so I would advise you to do some research on your own if you want to get really intricate on this. For now, as a beginner, following my routine will probably serve you just fine as you get some pincurl practice under your belt. The most important thing in this is a trial and error of paying attention to how you set your curls–what directions, etc–and noticing what results it produces in your hair, allowing you to adjust as needed if you find it creates problems or gives you results that you would like to alter.
The final thing you should know before I show you the How To is that the longer you leave your pincurls in the better the curl will be, and the longer it will hold after brushing out. You must allow your hair to dry fully before you brush it out, because damp curls will droop and will not be properly formed. If you still have some dampness at the time you must take out your hair and don’t have another hour or two to spare to allow it to dry completely then carefully use a hairdryer to finish drying the curls, then allow the hair to cool completely so that the hair can cool into it’s set. (In any heat created hair style the style isn’t set until the hair is cold, so curls created by heat will hold best when left in their curled position while cooling.)
Additional tip: Make sure you are wearing a top that either has a large head hole or straps. Nothing is more annoying than putting in all the effort to put in pincurls, brushing them out in the morning and realising you are in a tight-necked t-shirt that will ruffle your set as you take it off to get dressed for the day.
Basic information imparted, please now cut me some slack about how silly I look wet haired, half pincurled, and beheadscarfed as we enter the pictorial portion of this post, and let’s hold hands and do this! Well, maybe you should just hold my knee. I’ll need my hands free, after all. Let’s go!
The first thing you need to do after washing and conditioning your hair is gently towel it off so that it’s not sopping but is still damp. Comb through your hair, apply argan oil if you would like to, then apply your setting lotion. Comb your usual parting into place (side partings work best on retro hairstyles, however, if you want to create a wave.)
When I put in pincurls I work in rows from the front of my head to the back. working row after row down my head until completed, but it’s up to you whether you work instead in columns from the crown of your head down towards your neck, creating columns lining up towards the back of your head as you go, if you prefer. It doesn’t make a difference, you’ll still curl all the hair, it just depends what you find is easier in terms of visibility and accessing the uncurled hair as your head of pincurls build up. I’ll guide you through this process as if you’re working identically to me, but obviously if you’re not then just adjust my instructions.
Divide off a section of your hair at the top of your head on the large side of your parting, roughly 1-1.5inches wide, and clip back the rest of your hair. Divide that row into sections of hair also about 1 inch deep, most likely meaning you will have 3 or 4 sections of hair in this row. These sections will create your individual pincurls.
For the top three rows of hair at the crown of my head I tend to use elevated pincurls to give better volume, but because the way I sleep smooshes the rest of my hair I will be showing you how to pincurl the rest of the head using flat pincurls.


Take your first piece of sectioned hair. Starting at the hair ends, pinch the tip between your thumb and forefinger. Create a circle by curling the tip up to touch the shaft of hair on the hair’s underside, with the curl sitting so that the completed curl will be facing away from your parting, towards the side of your head (my right in these photos.). Keeping the tip of hair pinched between your fingers so that it doesn’t come loose, continue rolling your hair down towards your scalp to reach your head, keeping the pincurl as neat and circular as you can. Take a pincurl clip and carefully secure the pincurl to the hair at your scalp. (Do not use bobbypins/hair grips. They will leave a crimp in your hair.) Repeat this step with the other pieces of hair in your row. When row is complete, section off the next row of hair the same 1-1.5inch width.

When complete, change sides of your head to the other side of your parting. Create a row of pincurls in the same way, but instead of curling towards my left side as I did in these photos, curl your hair still towards the underside but so that the curl faces down the side of your head that has the smaller side of your parting, away from your parting. The smooth side of the pincurl coming from your roots, not the curled side, should be facing your parting.

To create flat pincurls on the rest of your hair you section your hair into rows and create pincurls in the exact same way and identical directioning as with the first 3 rows. But instead of securing the pincurl with the curl sitting atop your scalp, with the clip at the base of the curl, gently angle your curl flatter against your head and wind the pincurl a little extra if you feel the curl would be sitting too far below the section of hair you are creating the pincurl from. Use a pincurl clip as before, placing wherever will best hold the curl in place securely and without squashing the circle shape you have created. If you squash the curl into an oval or any other shape then your curl will come out misshapen.
Repeat this until you have done your entire head of hair. It’s trickiest at the back of your head, and you will definitely get achey arms at first. As you become used to creating the pincurls you will do them quicker and quicker, so your arms will stop aching because they won’t be in the air so long.

Tie your headscarf into place so that it keeps your curls secure. Don’t tie it too tight across your ears though, such brutality will cut off circulation eventually and you’ll likely wake in the middle of the night with the tips of your ears hurting.
You should aim to have your pincurls in for 10 hours at least if possible if you have midlength hair. Shorter hair, a la Marilyn Monroe length, may need less time, I’m unsure as I have hair that sits a few inches below my shoulders. Very long hair will likely need even longer, the only way to tell is to put in a set and clock how long it takes for your curls to totally dry. Even when your curls are dry it does good to leave them in as long as you can, so I like to put my pincurls in straight after work around 6.30 of an evening and give them until 8 the next morning before I go out, giving them a luxuriant 13 hours to set.
Once they’re dry, fetch the following. 1) A smoothing brush, I like my Denman’s one, 2) a few sectioning clips, 3) hairspray, 4) argan oil or pomade for defrizzing and sculpting. The latter will be personal preference and will take some getting used to, but I know pinups who use one or the other and swear by it, so it’s just about what works for you.
It’s best to take out your hair when your makeup is all done, and perhaps even once you’re already dressed, so that your hair is as fresh as possible when you leave the house.

Remove the pincurl clips. I like to leave in the pincurls that I use to create my wave while I’m brushing out the rest of my hair, but you don’t have to do this, especially if you’re not going to attempt a big wave.

Many pinups comb their fingers gently through their hair to separate the curls but I don’t do this as this gives me frizz, so give it a go doing it both ways on different sets to see what your hair does. Brush out your hair using your smoothing brush gently, brushing your hair against your hand to help control frizz. To get your curls to tuck under you must hold your hand on the outside of your hair and brush from the underneath, twisting the brush to encourage the curl to curl under with the motion. Keep brushing the hair until the curls start to take the shape you want. This can take quite a while, especially if you’re not used to it. When you create a wave or shape you like use the sectioning clips to secure the waves so they will remain supported as you work on the rest of your hair, and hairspray into place.

To smooth out babyhairs or combat frizz use only a tiny bit of argan oil or a tiny bit of pomade. Too much of either can’t be undone and will leave your hair looking greasy, so be cautious rather than liberal. Alternatively, for smoothing hairs into the body of the curls you’ve created you can spray a bit of hairspray onto your palm then smooth your hand down the hair, as I’m doing in the final picture in the sequence above.
As I brushed out my hair I decided I liked the shape it had created today without putting in my usual wave, so I skipped it. I can show you how to create a wave another time, but for ladies just starting out who are intimidated by a big peak, or those who simply don’t like it, your process ends here. It’s best to give your peak a little support though to stop it drooping further during the day by spraying it into place and using a sectioning clip in your hair for a few minutes to lift and support whatever peak you do have there.

If I ever find I have hair that doesn’t settle smoothly at my crown after brushing then I smooth the hair out by hand and use a sectioning clip to hold it into the place I want it to take, then spray and give it 5-10 minutes to set. Alternatively if your crimp is distinct you can carefully use some straighteners to smooth out any offending sections.
Spray your whole ‘do when you’re happy with the way it looks. Leave the sectioning clips in as you finish preparing for your day, then remove just before you leave the house. Done!
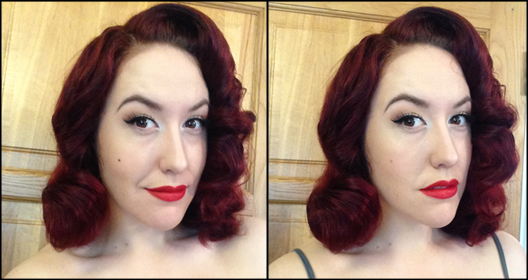
Don’t be discouraged if your hair doesn’t turn out the way you imagined. My wet pincurls I created in this pictorial are nowhere near as neat as they ought to be in theory, and while my hair certainly isn’t perfect after my brush out it still produced a pretty good set. Some of the fuzziness you might see here isn’t the result of the set but my need to get a hair trim and also to cut in new layers while letting other shorter layers grow out to best suit the style I want to create.
If you’re unhappy with your results then remember that hair flowers, bandannas and hair scarves are a god send in helping hide the rougher parts of a set. Failing that you can salvage a bad set by styling it into victory rolls, suicide rolls, and bumper bangs with a little practice there too, so don’t freak out if you end up with a brush out that doesn’t curl as it should. Breathe, reach for some bobbypins and a nylon scarf, and you’ll be fine. You can try again next time.
Over time you’ll find the action of pincurling easier and quicker, and you’ll get the knack of brushing out without creating too much frizz. Your hair, too, will adjust. I swear that I haven’t altered my routine or products much in months and months, yet my hair just seems happier to attempt to form a pageboy undercurl as I brush out, so your hair can have a will of its own sometimes and will eventually learn to do what you want it to with little effort on your part.
For video tutorials of how to do pincurls there’s no better place than Youtube. If you look yourself you’ll find dozens, but the one I recommend most, and the one I watched when I began the process, is this PinupDollAshleyMarie Authentic Pincurl tutorial video. Pinupdollashleymarie is great in general for all sorts of retro hair style tutorials, so definitely give her other videos a watch. Cherry Dollface is also a top recommendation Youtuber for retro hair tutorials, so check out her channel too, but she tends to use heat pincurls so I’m not sure she’ll have a video showing this specific process I was talking you through. This video shows you how to actually form pincurls, but they’re doing it on dry hair rather than wet. Still, it’s showing you in motion the movements I was trying to describe.
There you go, that’s the basics on how to wetset pincurl your hair. If you have any questions then just ask in the comments, but hopefully I’ve given you a good place to start and to get practicing. Good luck and good glam!
Lipstick Maybelline Color Drama velvet lip pencil in ‘Light It Up’

I LOOOOVE Pinup Ashley Marie!
I enjoyed the second video…he made it look so easy!!!
LikeLike
Pingback: Get To Know Me | missamymay
lovely tutorial. thank you. I’m just starting to change my style over into vintage & have been itching to do this to my hair. Cant wait to try this out 🙂
LikeLiked by 1 person
Thank you greatly for this informative and enjoyable post.
I read this at the beginning of my hair journey (and admittedly did not quite grasp all the concepts, but it gave me a healthy introduction),
And I am reading it again 6 months in to pin curling my hair every wash cycle. (Once every 7-14 days)
I regularly send this article to friends and family members who are interested in dabbling in pin curls.
You have been an incredible help to learning how to achieve a vintage style in a modern day. 🙂
LikeLike
I’m trying it today. But I’m sure it won’t be a success. First of all, I don’t have the pincurls, so I’m using bobbpins… so I know that the result won’t be as good. I have a very curly hair, and a BIG problem with frizz, so… Probably tomorrow I will have to use my rat or make some kind of chingnon…
LikeLike
You girls are too cute. This reminds me of of times in my lifetime that were pretty huge times for me.
First my grandmother taught me this when I was a little girl. This was the way she styled her hair on a regular basis. Of course until she felt that it was to much work as she became older. Then she would go & have her beautician do the work for her. For a very long time my grandmother never allowed them to put her hair in the hot rollers or a curling iron because of the heat damage.
Fast forward 20 years later & when I took cosmetology at my local college one of the first things that we had to learn was to pincurl our mannequins . Just a tip, you do not have to only use setting lotions. That’s all my grandmother would use, however her stylist & my instructor both suggested using mouse and gels. You can play around with which ones work best for your hair texture. Many people have a very difficult time holding curls. This is a technique that will hold even difficult hair that doesnt want to hold curls. Just have fun ladies…I have not seen nor heard of anyone doing this hair style now it’s been almost 30 years since I left hair school. This is pretty cool. How the trends come back.
Good luck to all of you ladies wanting to achieve this technique. You can do it. You can actually make a ton of beautiful curls and styles doing this
LikeLike
I am going for a very very tight curl and I tried this but I didn’t get a proper tight curl can you do another day
LikeLike
Do you mean can you try pincurling your hair the day after another attempt? You definitely can, but if you’re doing it on dry hair you might find your hair doesn’t hold the curl very well, that depends on your hair type. If you’re washing your hair to start from the beginning then your last attempt won’t make a difference to your next attempt.
LikeLike
I wanted to ask how long did it take for you to do this(not drying time)
LikeLike
It takes me about 20-30 minutes to pincurl my hair, but if you have very long or thick hair, and/or a beginner, it will likely take you longer at first as you get used to doing it
LikeLike
Pingback: How To Make Pin Curls | Vintage Waves Without Heat