

A while back I saw two pairs of clear sandals being sold on Pinup Girl Clothing, then became aware soon afterwards that Miss L Fire sell Cinderella style shoes in 4 different shades–for £94.99. Dita Von Teese visited Italy and Instagrammed pictures of her perfect newly acquired Dolce & Gabbana Cinderella heels, and a little search online turned up news I had missed that Louboutin made an elaborate pair of Cinderella heels too. The Dolce & Gabbana pair were, of course, exactly what I would want in a dream life where I had the kind of money to drop thousands on what I wear on my feet, which I obviously don’t. I didn’t really like the Miss L Fire heels enough to be willing to part for the near £100 for those either, as they weren’t close enough to the styles I was picturing in my head and swooning over. The Pinup Girl Clothing offered pairs (clear and slightly bedazzled) were closest to what I wanted, as well as my budget, but the clear pair was out of stock at the time and the slightly bedazzled Belle pair still were not quite right. So the usual thought occurred to me: is it possible for me to actually create the precise thing I am picturing? And the answer was yes.

Clockwise from top left: Pinup Girl Clothing, Dita in Dolce & Gabbana, Miss L Fire, and Christian Louboutin
I wanted sandals that had clear heels and a clear strap across the foot. I was unsure at first as to whether I ought to be sensible and choose a lower 3 inch heel, or whether to go for my preferred height of 4-5 inches. I did some searching on eBay and decided these Pleaser heels would work for me. Yes, they are stripper heels, and/or posing for fitness competitions. But I would be making them cute and wearing them in a Cinderella style, so the stripper feel would eventually dissipate (I hoped).

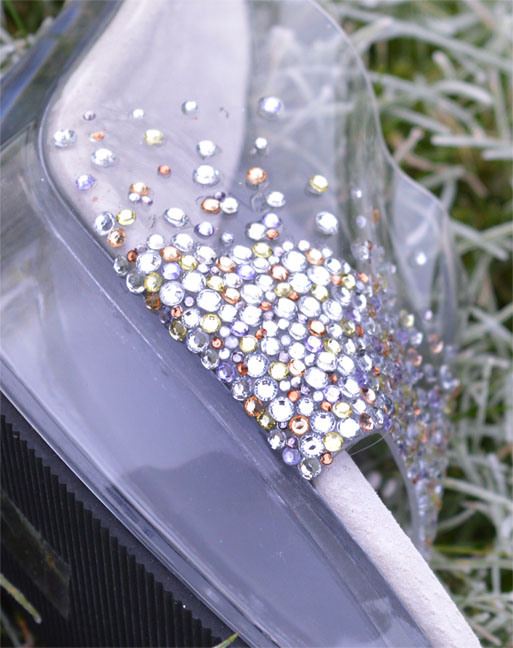
As I bedazzle often I already had all the crystals I wanted in stock, but for those of you who don’t have a bunch of crystals to hand you’ll have to figure out what look you’re going for before you order. I made my heels primarily from clear flat back crystals, but I also included crystals of differing sizes in light yellow, pale lilac, coffee, grey and champagne to add a slight colour spectrum. If you want to do the same as I’ve done then you’ll want to order clear crystals in 5mm, 3mm and 2mm, and 2mm and 3mm in the colours like champagne, pale yellow, lilac, grey and coffee. It’s easiest to buy crystals in packs of 1000 but you won’t need anywhere near that amount for these shoes alone, so if you don’t want to spend out the extra money on more crystals than you need in multiple colours and sizes then you’ll have to narrow down the number of colours you want to include or find packs of smaller quantities. If you do buy more than you need, though, you can always buy additional clear crystals too so that you have enough to make a matching clutch bag or hair accessory. If you don’t want multiple colours in your design, then all you need to do to copy this design is buy your single colour crystal in two or three different sizes so you can create the same pattern dynamic.
I buy all my crystals on eBay, as I find that cheapest and most convenient, but you can also purchase them at craft stores or splash out to buy real Swarovski crystals.
I’ve posted a full tutorial before for bedazzling, so if you’ve never bedazzled before you should read that now for a thorough walk through on what to do, cost, equipment, etc. This project is much simpler than your usual project of bedazzling a full pair of heels though, so if you know what you’re doing all you really need to do is get your gem picker, your glue (which glue to use is covered in the above tutorial) and get sticking. If you’re coping the style of my heels then have your different coloured crystals laid out in little piles on your tray so you can easily access the colours you need. You’ll be using more clear crystals than coloured, but you need to keep the colour pattern random while also being aware to distribute the different colours evenly; for example, if you placed a clear crystal then a champagne crystal, next place another couple clear crystals before you place another coloured crystal, not champagne and preferably a colour that is not yet represented in the immediate small area you’re working on so that said colour doesn’t get under-used.
If you’re copying the style of my heels then do 3-4 solid rows of crystals across the entire bottom width of the foot strap nearest your toes, then create small and subtle peaks of crystals at 3-4 points across the shoe to begin a gradient effect of the crystals dispersing upwards. At the sides of the shoe you will need to fill in a bigger section of solid crystals as the shoe sides have a greater area of the transparent strap than the middle of the strap. Next, make small groups of 3-5 crystals near but not touching those peaks that are attached to the solid bedazzled stretch. Add individual crystals of different sizes at random intervals near the peaks and clusters you’ve created, as well as distancing further up the shoe. You want to create the effect that the crystals are spreading out as you go upwards so use fewer crystals to begin with and build up where needed as you don’t want to go in too heavy handed and end up having to solidly bedazzle half or even the whole strap because the effect isn’t working.

First shoe immediately after finishing, glue still wet
When you do your second shoe refer back to your first shoe when you create the dispersion peaks and groups so that your heels aren’t wildly different from one another, but exact identical placement isn’t a big issue in this style, especially since people will not be able to see the pattern that closely when it’s on your feet. Depending upon how used to bedazzling you are and how carefully you do your dispersion, this project will only take you 2-4 hours. And afterwards you get to pop up wearing your shoes in a totally on-the-nose fashion, like me below excitedly whipping them out to wear with my Disney-esque Pinup Girl Clothing Castle print Jenny skirt. What did you think I was making them for?
 Are you tempted to make yourself some CinderShoes? If so, let me know!

Pingback: Jenny January–Success! | missamymay
I really need a pair of Cinderella shoes for an upcoming pageant, but I need ones with a back on them because I cannot walk in heeled sandals without ankle support. 🙂 If I find a pair, I’ll definitely be bedazzling them though!!
LikeLike
Pingback: August Outfits Round Up | missamymay
Pingback: Smart, Sassy and Stylish: Meet Miss Amy May - The Dressed Aesthetic