
Whether you want to bedazzle a pair of shoes, a phone case or a headband, you’re going to need the same materials and the same methodology. Hopefully by the end of this post you’ll know what you need to know in order to get gluing and glittering all over town. Let’s get to it.
What you’ll need:
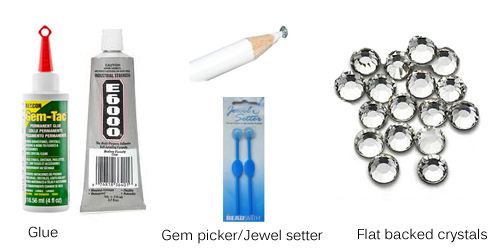
– Glue, specifically made for bedazzling. I use GemTac, but you can also use E6000 (which must be used in a well ventilated area and preferably while wearing a mask, as there’s links to cancer with this glue. Part of why I prefer GemTac.)
– A gem picker/jewel setter. Typically a wax end picker, as pictured below at the bottom of the equipment image, but I prefer to use a pencil picker, as pictured at the top.
– Your shoes or accessory of choice, clean and dry.
– Flat backed crystals, obviously.
My first tip before I get into the specifics is that it will make your life much easier if the colour of the item you’re covering is identical to or similar to the crystals you’re overlaying. This is because no matter how hard you try to align your crystals exactly side by side you’re likely to end up with very small gaps between the crystals in some areas, especially if you’re dealing with an item that has any sort of curvature to the surface, and so a tiny slither of red between red crystals is going to be much less noticeable than a glimpse of black between clear crystals. This isn’t too difficult a matching task if you’ve bought an item specifically to be covered and can purchase the right colour beforehand, but if you’re giving a new lease of life to an old pair of white shoes and you now want them to be blue I recommend you get handy first. Use permanent marker, paint, or glitter in a colour that matches the crystals you’re using to give you a base coat that will mask your potential little beginner’s mistakes.
CRYSTALS
When it comes to the crystals there’s a few things you’ll need to consider and decide. If you want to go the Swarovski route this is going to become less of a ‘budget’ job and will cost considerably more, considering Swavorski crystals cost around £3+ for a pack of 100 non-hot fix crystals, compared to a bag of 1000 flat backed crystals for between 99p-£1.50 online. If you can afford that, great! But personally I’ve only ever dealt with the cheap non-Swarovski crystal kind, so that’s the guide I’m going to be offering you here. Here are the things you’ll have to address.
Crystal Size
The crystal size you use is up to you and depends both on the surface area you’re covering and the look you want to achieve. Obviously the bigger the crystal you use the quicker you will be able to cover the surface, so shoes covered entirely in 2mm crystals will take you many hours longer to complete than shoes covered in 5mm crystals. If you want a very fine glittering, 2mm or 3mm crystals is the way to go. But if you’re happy with bigger glints of sparkle then you can use 4mm, 5mm, or even upwards if you’re covering a large item (corset, binder, random stranger off the street) or simply crave a big rock kind of look. Below you can find a picture of heels I’ve bedazzled in different crystal sizes to give you a better idea of what you might want.

(Click for a bigger picture to see in detail)
Unless you choose to use 2mm crystals across your entire item you’re going to need to buy crystals in 2 or 3 different sizes to ensure a gapless coverage all over. If you try to line up 5mm crystals exactly so that no gaps appear between the crystal edges this will only work on a flat surface, but you will encounter problems with any item that has curvature to the body. So shoes, for example, definitely pose an issue of gaps appearing where the curvature of the surface changes and causes your neat crystal sequence to misalign. Below is a picture of a potential-gap issue occurring, and the way in which you try to place smaller crystals into the gap in order to fill it (it looks quite messy but when the glue is dried and the entire item is finished these areas aren’t noticeable. If you want to be a real perfectionist about it then you’ll probably want to order 1mm crystals and be prepared to alter your pattern plan for a larger area.)

To bypass this gap problem you’ll need to order crystals 1-3mm smaller than your current crystal size in order to fill the gaps as much as necessary until you can neatly fix your main crystal size back into it’s regular side-by-side formation. You’ll need much fewer small sized filler crystals than your main crystal size though, so remember to only order a total quantity of filler crystals at a ratio of about one quarter to one third of your largest crystal quantity. (Example: order 3,000 small crystals if you’re ordering 10,000 larger crystals for your project, or less if you’re dealing with a fairly flat item which doesn’t have many altering contours.)
Quantity.
This one is hard to judge. When I bedazzled my first pair of shoes I ordered 5000 2mm blue crystals, then discovered it wasn’t enough and had to order more. Which is fine, except I forgot which seller I had used on eBay and ordered from a different seller who sent crystals which didn’t 100% match those I was already working with. Being that I was 80% done with the pair of shoes and working to a deadline of when I wanted to wear them I used the gems anyway and thankfully the colour difference wasn’t visibly noticeable during wear, as it was on the inside of the shoe.
My suggestion, therefore, would be to make sure you always order gems for a single bedazzling project from the same seller (and preferably in one purchase) if you are ordering online, or buy all your gems in one purchase if buying in-store, to make sure you won’t have any colour mismatch problems across different batches. Similarly, I always suggest you over-buy the number of crystals you expect to use. There’s nothing worse than getting 70% done with a project and then having to find time around your schedule to make a special trip back to the craft store before you can continue, or, worse yet, having to wait 3 weeks while your gems travel from Hong Kong or from wherever else they might be hailing if you order online, as I do.
So, it might seem crazy, but if you want to bedazzle a pair of platform 5.5 inch heels, yes, buy the bulk 10,000 crystals. It’s better to have extra crystals you can then use on other projects (matching clutch bags, anyone?) than to run out. You’re already saving yourself a wad of cash by doing the sticking yourself rather than buying a custom made pair online for 100 bucks or more, so you can afford the extra few dollars/pounds of excess stock.
Colours & patterns
If you can picture it, you can make it. Crystals come in dozens of colours and finishes, especially online (eBay is my godsend. So if you want to make a pair of multicoloured rainbow heels it’s just as possible as making a pair of silver rhinestone shoes. I’ve made a pair of heels before using clear crystals for the bulk, but also champagne, light blue, pale yellow, olive oil green and light coffee as ‘switching it up’ additional colours so that from afar my shoes look cinderella sparkly but they’re much more interesting up close. If you want to create a specific pattern on the shoe you’ll do best to draw it out on the shoe first so that you know where you’re sticking and you won’t make any mistakes.

Where to buy:
eBay is my go to. You can check your local craft store, or hit up your favourite search engine to search around for deals, but I’ve only ever used eBay because it’s all I’ve ever needed (also, I live in the English countryside, where craft stores are if not few and far between then damn near non-existent.) I buy my glue on eBay too, my gem pickers, and so far about a dozen different crystal colours.
THE PROCESS
You have your glue. You have your crystals. Your shoes are ready. It’s time to begin. Thankfully this is pretty easy, and there’s no ‘wrong’ way to do it. You just have to put the crystals on the shoe/bag/fabulous new pet turtle you just bought, and make sure they stay put. [Unnecessary disclaimer: Do not actually bedazzle a turtle.]
One thing I do which isn’t the norm is that I apply my glue straight onto my item as I go. Typically bedazzling guides will tell you to put a splodge of glue onto something disposable like a paper plate and use your gem picker to dip the crystal’s back into the glue before applying it to the shoe by placing it lightly in the area you need, then gently prodding the crystal into its precise position to ensure a tight fit. I don’t like the wax ball gem pickers, because I feel like I don’t have a great deal of precision of placement due to the area of the wax ball, but when I use my preferred gem picker pencils I always find my crystal falls off into the glue and stays put when I use the separate glue method, and this does not work for me. Literally.
Instead I carefully spread a thin layer of my GemTac glue onto the small area of shoe I am working on, an area of maybe 3cms square at a time or 1cm wide if working along in rows, and then place my crystals directly onto the glue. If you give it a couple of minutes to get tacky after each application then the glue won’t be so slidey and your gems are more likely to stay where you’ve placed them rather than following your gem picker back into the air. You also won’t end up with a small wall of glue enveloping your crystal on all sides due to you pressing the crystal down into such a wet mass (something I do quite a bit, because I’m impatient.) This glue wall isn’t really a problem overall, and can actually help to keep your crystals firmly in place, but it’s much harder to tell if you’ve placed your crystal as closely as possible to its neighbour when you’ve got a little mound of glue oozing up the sides to obscure the edges of the crystals.

It’s just a case of trying out what feels easiest and most comfortable to you in regards to the glue issue. You might be a backwards gluey freak like me, in which case we can hold hands and skip in our sparkly new pretties, but if you’re a by-the-book kind of bean then fret not, I’ll still love you.
Now, you might be wondering ‘Where do I start? Which crystal goes on first?’ The answer is that it doesn’t matter. Being sensible it makes more sense to start at whichever point of the item you don’t need to touch so much, thereby reducing the chance of you accidentally misplacing freshly glued crystals by grabbing at that part of the item as you work. With heels, I tend to like to be able to pick up the shoe to hold it or move it around using the heel, so that is always the last part I cover. But that aside, it doesn’t matter.
When working on shoes I like to start on toe of the shoe, right at the top where you slip your toes in, and line the shoe with a row of crystals around that curve about 2 inches wide. I then begin a second row beneath the first, slotting the gems into place beneath the first row so that the crystals are fitting into the spaces created by the touching crystals above of the first row. I continue doing this making my way down the shoe until I reach the sole, filling in awkward gaps with smaller gems where necessary as I go.
When you near the edge of the sole you will likely have to use more small crystals than in the body of the shoe because here there may not be enough space to fit an entire 5mm gem (or whatever size you picked,) or perhaps the curvature of the shoe’s body meeting the shoe is too extreme for one single crystal to sit nicely. This is fine. Use as many little crystals as you need. Once I hit the sole, I go back to the top of the shoe and continue to extend the top row I started at the beginning, working along for a couple inches, then bedazzling down the side of the shoe until I hit sole again. Repeat for several hours until you’re done.

Timing expectations are hard to offer. As I mentioned before, if you’re using all 2mm crystals on something like a pair of heels then prepare to spend a potential 30 hours on them. It sounds daunting, but if you do it at a table or on a lap tray while you listen to music or, like me, play a tv show or movie in the background that you don’t have to watch closely, then you’ll slowly get through the task in a few weeks, or less time if you get super addicted and intense about it (it happens. You might dream crystals for a while.) If, however, you use larger crystals like 5mms, that time could cut down to maybe 12 hours, maybe just 7 on a pair of flats. Plus there’s the actual size of your shoes to consider: if you’re a size 5 shoe and prefer heels under 3 inches with no platform and a peep toe then you’re going to be whizzing through those heels in no time. It’s all about surface area.
Written down like this it’s easy for this all to sound too time consuming to bother with, but in all honesty I am not a patient person and I’ve managed to bedazzle 7 pairs of heels in the year or less I’ve toyed with this hobby, and each pair has taken two weeks or less working in my free time. There’s something endlessly rewarding about turning an item you’re not that fond of into something beautiful and unique with just a few thousand crystals and your own hands. Every single time I wear a pair of my sparkly shoes I get compliments on them, compliments which become awed and–pardon me, but I must–dazzled when I coyly reply ‘Thank you, I actually made these myself.’ It’s a surprisingly therapeutic way to create something new, and if you’re daunted by the idea of starting big then don’t–bedazzle your computer mouse, phone cover, kindle case, sunglasses case, compact mirror, a small photo frame, your travel mug, a hair clip, a fridge magnet, a notebook…The possibilities really are endless. Just like that pretty, pretty rainbow you’ll be making as you strut down the sunny street in your crystal shoes. Go get ’em, Cinderella!

Thanks for all the helpful tips! This was very thorough and comprehensive!
LikeLike
this has made me want to try it! brill advice!
LikeLike
Thank you so much for writing this up – can I ask about your platform shoes? I have a real problem with anything over 2.75 inches, so I’ve been searching for platforms that would be large enough make the shoe that equivalent angle. Those look like a really wide platform.
LikeLike
Pingback: DIY Project: Cinderella Shoes | missamymay
Pingback: Good Golly Miss Molly! | missamymay
Pingback: 1 Year Blogiversary Retrospective & Giveaway | missamymay
Pingback: Seamless, Swinging Maria [Goldie’s Clothing] | missamymay
Pingback: August Outfits Round Up | missamymay
Pingback: September Outfits Round Up | missamymay
Pingback: Pinup Halloween: Dorothy [Wizard of Oz] | missamymay
Pingback: Smart, Sassy and Stylish: Meet Miss Amy May - The Dressed Aesthetic
Pingback: October Outfits Wrap Up | missamymay
Pingback: Feelin’ Fatale [The Pretty Dress Company] | missamymay
Pingback: Party Dress Season: Unique Vintage | missamymay
Pingback: Fashion Friday featuring Queen of Heartz | Sarah Forshaw's Blog
Pingback: December Outfits Round Up | Missamymay
Pingback: #JennyJanuary 2016 | Missamymay
Pingback: January Outfits Round Up | Missamymay
Omg, this post is so informative thanks for posting, I can’t wait to try my first project. 💖
LikeLiked by 1 person
Pingback: June Outfits Round Up | Missamymay
Pingback: July Outfits Round Up | Missamymay
Pingback: November Outfits Round Up | Missamymay
Pingback: Party Dress: The Chic Claus [Dolly & Dotty] | Missamymay
This definitely helped a lot.
LikeLike
Pingback: December Outfits Round Up | Missamymay
Pingback: Sky Blue, Gingham Too [Collectif] | Missamymay
Pingback: February Outfits Round Up | Missamymay
Pingback: May Outfits Round Up | Miss Amy May
Pingback: May Outfits Round Up | Miss Amy May
Pingback: April Outfits Round Up | Miss Amy May
Pingback: Sundress Sylvia [Voodoo Vixen] | Miss Amy May
Pingback: Little Miss Dyann [Retrospec’d] | Miss Amy May
Pingback: March Outfits Round Up | Miss Amy May
Pingback: Fully Customised [eShakti] | Miss Amy May
Pingback: February Outfits Round Up | Miss Amy May
Pingback: Dolly & Dotty + Giveaway! | Miss Amy May
Pingback: May Outfits Round Up – Clothing Reviews
Pingback: Full of Roses [Love UR Look] | Miss Amy May
Hey girl! how many crystals should I get to bedazzle cowboy boots?? LOL! I go to A&M and im making some Aggie themed boots!
LikeLike
That will be A large project but very cute!
LikeLike
Pingback: A New Signature Sparkle [Hotter Shoes] | Miss Amy May
Pingback: Would you live here? – Single Gals
Pingback: DiscoverNet | How To Decorate Your Home Like Elle Woods From Legally Blonde
Your beginner’s guide to bedazzling is fantastic! It’s packed with helpful tips and clear instructions on materials, crystal sizes, and patterns. You’ve made this creative project sound fun and achievable, and I’m excited to give it a try thanks to your straightforward guidance.
LikeLike
hi, i know you posted this guide 10 years ago, but in the case that you happen to respond to this, would you be able to tell me how worried i should be about the sticking power of the crystals on a surface that flexes and moves? i have a pair of boots i want to bedazzle, but i noticed this guide focuses mostly on heels that dont cover the ankle area – i.e. dont flex. the surface of my boots will need to flex when i walk. will this be a problem? thanks so much!
LikeLike
Hiya! Bedazzling things that flex is totally fine—I bedazzled a pair of ballet flats that I wore constantly and the area that flexed where my toes bent as I walked held up fine. An item that’s used constantly will loose a few gems here and there but you can just glue replacement gems into any bald spots as needed, I used to do that once a year or so with my aforementioned flats.
Since I haven’t bedazzled anything in years I can’t tell you whether there’s any newer or improved glues that hold up even better, buuut on TikTok I have seen dozens of folks bedazzling knee high boots to go to the Taylor Swift Eras Tour, so maybe it’s worth finding some of those videos to see what glue they’re using? Otherwise just do a bit of googling to see what glue tends to be popular among bedazzlers these days.
LikeLike
thanks so much, thats good to know! ✨✨✨✨
LikeLike